Minor workflow tweak - Add New Empty Action as New Action Strip.
Hotkey: Shift N.
Menu Entry: 'Strip' menu

Creates a new action, and adds it as an action strip at the bottom of
the list nla-strips for an object. Useful for creating additional strips to
correct poses of prior strips.
Todo Tracker Item: #4754

Now the 'Convert Action to NLA Strip' command (CKEY) is able to
be found in the NLA editor's header in the Strip Menu. It now tries
to add a convert the active action of the active object (so it is no
longer dependant on mouse location).
Now time-markers work in all time-related spaces (i.e. Ipo,
Action Editor, NLA editor, TimeLine, Sound). The hotkeys and
functionality set should be the same for each of these modes
(with a few exceptions still). I've had to change a few hotkeys
here and there, so hopefully they aren't too bad.

Marker Operations:
MKEY - Add Marker
SHIFT MKEY - Rename marker (was CTRL MKEY)
XKEY - Delete Marker
PAGE UP - Jump to next marker
PAGE DOWN - Jump to previous marker
CTRL A - Select all markers
SHIFT G - Transform markers (NLA, IPO, Action)
G - Transform markers (Sound, Timeline)
CTRL SHIFT D - Duplicate markers (NLA, IPO, Action)
SHIFT D - Duplicate markers (Sound, Timeline)
BKEY - select markers and other keyframes (if any)

I've also made a few little tool additions to NLA and Action editors:
* NLA editor - Snap To Frame.
Now with the option to offset strip so that it starts at the current frame.
Added menus for this.
* Action editor - Snap To Frame
A few new menus for this too
- FORWARD CYCLING & MATCHING
Up to no now, adding multiple actions in NLA with walkcycles required to
animate them standing still, as if walking on a conveyor belt. The stride
option then makes the object itself move forward, trying to keep the foot
stuck on the floor (with poor results!).
This option now allows to make walk cycles moving forward. By
indicating a reference Offset Bone, the NLA system will use that bone to
detect the correct offset for the Armature Pose to make it seamlessly going
forward.
Best of all, this option works as for cyclic Action Strips as well as for
individual Action Strips. Note that for individual strips, you have to set
the strip on "Hold". (Might become automatic detected later).
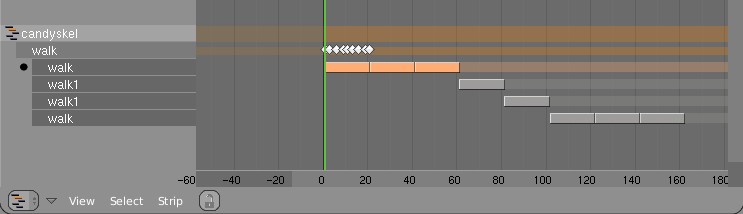
Here's an example edit image for NLA:
http://www.blender.org/bf/nla_match-cycle.jpg
And the animation for it:
http://download.blender.org/demo/test/2.43/0001_0150_match.avi
Blender file:
http://download.blender.org/demo/test/2.43/mancandy_matching.blend
Using this kind of cycling works pretty straightforward, and is a lot
easier to setup than Stride Bones.
To be further tested:
- Blending cycles
- matching rotation for the bones as well.
- ACTION MODIFIERS (motion deformors)
The above option was actually required for this feature. Typically walk
cycles are constructed with certain Bones to be the handles, controlling
for example the torso or feet.
An Action Modifier allows you to use a Curve Path to deform the motion of
these controlling bones. This uses the existing Curve Deformation option.
Modifiers can be added per Action Strip, each controlling a channel (bone)
by choice, and even allows to layer multiple modifiers on top of each other
(several paths deforming motion). This option is using the dependency graph,
so editing the Curve will give realtime changes in the Armature.
The previous walkcycle, controlled by two curves:
http://download.blender.org/demo/test/2.43/0001_0150_deform.avi
Blender file:
http://download.blender.org/demo/test/2.43/mancandy_actiondeform.blend
Action Modifiers can be added in the NLA Properties Panel. Per Modifier you
have to indicate the channel and a Curve Object. You can copy modifiers from
one strip to another using CTRL+C (only copies to active Object strips).
Setting up a correct Curve Path has to be carefully done:
- Use SHIFT+A "Curve Path" in top view, or ensure the path is not rotated.
- make sure the center point of the Curve Object is at the center of the
Armature (or above)
- move the first point of the curve to the center point as well.
- check if the path starts from this first point, you can change it using
(in Curve EditMode) the option Wkey -> "Switch Direction"
- Make sure alignment uses the correct axis; if the Armature walks into
the negative Y direction, you have to set in Object Buttons, "Anim settings"
Panel, the correct Track option. (Note; option will probably move to the
Modifier later).
This is a good reason to make such paths automatic (on a command). Is on the
todo list.
Also note this:
- the Curve Path extends in beginning and ending, that's (for now) the default,
and allows to use multiple paths. Make sure paths begin and end horizontal.
- Moving the Curve in Object Mode will change the "mapping" (as if the landscape
a character walks over moves). Moving the Curve in Edit Mode will change the
actual position of the deformation.
- Speed (Ipos) on paths is not supported yet, will be done.
- The Curve "Stretch" deform option doesn't work.
- Modifiers are executed *after* all actions in NLA are evaluated, there's no
support yet for blending multiple strips with Modifiers.
- This doesn't work yet for time-mapping...
This commit is mostly for review by character animators... some details or
working methods might change.
This feature can also be used for other modifiers, such as noise (Perlin) or
the mythical "Oomph" (frequency control) and of course Python.
Special thanks to Bassam & Matt for research & design help. Have fun!
-> Locked Strip length
When changing time of the animation curves in an Action, the strips in NLA
just remained the same length, causing very confusing situations.
By setting the strips to Locked (Nkey NLA window), it always updates the
strip length to make sure all keys are included, and not more. From now on
(not on old files) this is the default strip method.

-> ALT+C clear size
This menu has 2 options, the first clears the size, the 2nd remaps the
action (only when you didnt use the new Lock feature).
Both options are in the Pulldown menu too

-> Key drawing
The weird beveled button in Action/NLA didn't accurately show what time it
was actually on. I've replaced it with an Icon now, diamond shaped, in a
design derived from the TimeLine markers.
The outliner is a hierarchical diagram displaying a list of data in Blender
and its dependencies. The 'databrowse' doesn't really show it, and Oops is
too chaotic still. And most of all, the former two don't offer much tools.

After discussions on irc, Matt came with this design proposal;
http://mke3.net/blender/interface/layout/outliner/
Which is closely followed for the implementation.

The current version only shows all 'library data' in Blender (objects,
meshes, ipos, etc) and not the 'direct data' such as vertex groups or NLA.

I decided to make it inside the Oopw window, as an option. You can find the
option in the "View" pulldown, or directly invoke it with ALT+SHIFT+F9
Here's a quick overview of the Outliner GUI:

- Header pulldown has options what it can show (Visible = in current layers)
- click on triangle arrow to open/close
- press AKEY to open/close all
- Leftmouse click on an item activates; and does based on type a couple of
  extra things:
  - activates a scene
  - selects/activates the Object
  - enters editmode (if clicked on Mesh, Curve, etc)
  - shows the appropriate Shading buttons (Lamp, Material, Texture)
  - sets the IpoWindow to the current IPO
  - activates the Ipo-channel in an Action
- Selected and Active objects are drawn in its Theme selection color
- SHIFT+click on Object does extend-select
- Press DOTkey to get the current active data in center of view


TODO;
- rightmouse selection; for indicating operations like delete or duplicate
- showing more data types
- icon (re)design...
- lotsof options as described in Matts paper still...
(adding)
#ifdef HAVE_CONFIG_H
#include <config.h>
#endif

also the Makefile.in's were from previous patch adding
the system depend stuff to configure.ac

Kent
--
mein@cs.umn.edu