All data layers, including MVert/MEdge/MFace, are now managed as custom
data layers. The pointers like Mesh.mvert, Mesh.dvert or Mesh.mcol are
still used of course, but allocating, copying or freeing these arrays
should be done through the CustomData API.

Work in progress documentation on this is here:
http://mediawiki.blender.org/index.php/BlenderDev/BlenderArchitecture/CustomData


Replaced TFace by MTFace:

This is the same struct, except that it does not contain color, that now
always stays separated in MCol. This was not a good design decision to
begin with, and it is needed for adding multiple color layers later. Note
that this does mean older Blender versions will not be able to read UV
coordinates from the next release, due to an SDNA limitation.


Removed DispListMesh:

This now fully replaced by DerivedMesh. To provide access to arrays of
vertices, edges and faces, like DispListMesh does. The semantics of the
DerivedMesh.getVertArray() and similar functions were changed to return
a pointer to an array if one exists, or otherwise allocate a temporary
one. On releasing the DerivedMesh, this temporary array will be removed
automatically.


Removed ssDM and meshDM DerivedMesh backends:

The ssDM backend was for DispListMesh, so that became obsolete automatically.
The meshDM backend was replaced by the custom data backend, that now figures
out which layers need to be modified, and only duplicates those.


This changes code in many places, and overall removes 2514 lines of code.
So, there's a good chance this might break some stuff, although I've been
testing it for a few days now. The good news is, adding multiple color and
uv layers should now become easy.
Using acos(dot(u, v)) to find the angle between two vectors is quite
inaccurate, and there's a better way to do it, as explained here:
http://www.plunk.org/~hatch/rightway.php

Also changed the use of atan for computing roll to atan2 in some places,
the latter avoids accuracy and division by zero issues.
Log again:

 Log:
  1)
  Bugfix: Beziers in curve didn't calculate the tilt values correctly for
  the endpoint and not for all handle types. That way deforming curves didn't
  extend the tilted deform either. (IRC report by Jahka)

  2)
  If you setup a Proxy for Armatures, the protected bones now have an error
  pupup for buttons and for some of the tools in 3d window (constraint edit
  mostly).
  Also the Bones Panel shows a note when the bone is not editable.
THE OBJECT PROXY

Or simple said; local control of referenced data from libraries.
Having library files with references is a very common studio setup, and
Blender did do quite well in that area. Were it not that for character
setups it was impossible to use still.

This commit will enable a full rig+character to remain in the library,
and still have - under strict control - local access for animation edits.

Full log:
http://www.blender3d.org/cms/Proxy_Objects.824.0.html
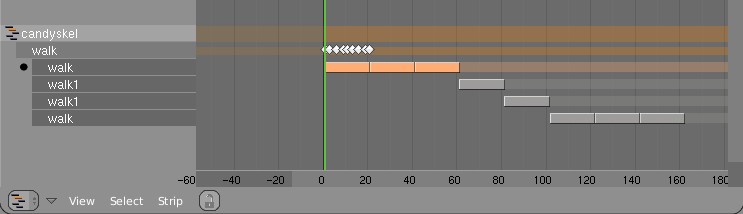
- FORWARD CYCLING & MATCHING

Up to no now, adding multiple actions in NLA with walkcycles required to
animate them standing still, as if walking on a conveyor belt. The stride
option then makes the object itself move forward, trying to keep the foot
stuck on the floor (with poor results!).
This option now allows to make walk cycles moving forward. By
indicating a reference Offset Bone, the NLA system will use that bone to
detect the correct offset for the Armature Pose to make it seamlessly going
forward.

Best of all, this option works as for cyclic Action Strips as well as for
individual Action Strips. Note that for individual strips, you have to set
the strip on "Hold". (Might become automatic detected later).

Here's an example edit image for NLA:
http://www.blender.org/bf/nla_match-cycle.jpg
And the animation for it:
http://download.blender.org/demo/test/2.43/0001_0150_match.avi
Blender file:
http://download.blender.org/demo/test/2.43/mancandy_matching.blend

Using this kind of cycling works pretty straightforward, and is a lot
easier to setup than Stride Bones.

To be further tested:
- Blending cycles
- matching rotation for the bones as well.

- ACTION MODIFIERS (motion deformors)

The above option was actually required for this feature. Typically walk
cycles are constructed with certain Bones to be the handles, controlling
for example the torso or feet.
An Action Modifier allows you to use a Curve Path to deform the motion of
these controlling bones. This uses the existing Curve Deformation option.
Modifiers can be added per Action Strip, each controlling a channel (bone)
by choice, and even allows to layer multiple modifiers on top of each other
(several paths deforming motion). This option is using the dependency graph,
so editing the Curve will give realtime changes in the Armature.

The previous walkcycle, controlled by two curves:
http://download.blender.org/demo/test/2.43/0001_0150_deform.avi
Blender file:
http://download.blender.org/demo/test/2.43/mancandy_actiondeform.blend

Action Modifiers can be added in the NLA Properties Panel. Per Modifier you
have to indicate the channel and a Curve Object. You can copy modifiers from
one strip to another using CTRL+C (only copies to active Object strips).

Setting up a correct Curve Path has to be carefully done:
- Use SHIFT+A "Curve Path" in top view, or ensure the path is not rotated.
- make sure the center point of the Curve Object is at the center of the
  Armature (or above)
- move the first point of the curve to the center point as well.
- check if the path starts from this first point, you can change it using
  (in Curve EditMode) the option Wkey -> "Switch Direction"
- Make sure alignment uses the correct axis; if the Armature walks into
  the negative Y direction, you have to set in Object Buttons, "Anim settings"
  Panel, the correct Track option. (Note; option will probably move to the
  Modifier later).

This is a good reason to make such paths automatic (on a command). Is on the
todo list.

Also note this:
- the Curve Path extends in beginning and ending, that's (for now) the default,
  and allows to use multiple paths. Make sure paths begin and end horizontal.
- Moving the Curve in Object Mode will change the "mapping" (as if the landscape
  a character walks over moves). Moving the Curve in Edit Mode will change the
  actual position of the deformation.
- Speed (Ipos) on paths is not supported yet, will be done.
- The Curve "Stretch" deform option doesn't work.
- Modifiers are executed *after* all actions in NLA are evaluated, there's no
  support yet for blending multiple strips with Modifiers.
- This doesn't work yet for time-mapping...

This commit is mostly for review by character animators... some details or
working methods might change.
This feature can also be used for other modifiers, such as noise (Perlin) or
the mythical "Oomph" (frequency control) and of course Python.

Special thanks to Bassam & Matt for research & design help. Have fun!
In a quick glance: (temp image)
http://www.blender.org/bf/rt.png

Main reason is that Lattices are useful a lot for Armature deformation.
Lattices just provide much more precise and interesting control. However,
with only bone envelopes it's very hard to use.

Working with Lattice vertex groups is nearly identical to Mesh:
- on CTRL+P 'make parent' you can choose the deform option now
- In editmode, the buttons to control vertex groups are available
- In outliner you can select vertexgroups too
- Deforming Lattices with Armatures has all options as for Mesh now.

Note:
- No WeightPaint has been added yet. To compensate, the editmode
  drawing for a Lattice with vertex group shows weight values for the active
  vertex group.
- Lattice editmode doesn't undo/redo weight editing yet.
- Softbody for Lattice still uses own vertex weights

Implementation notes:
- derivedmesh weight_to_rgb() is now exported to drawobject.c
- been doing cleanups in code (order of includes, var declarations, etc)
- weightpaint button handling now is generic

I've checked on Brecht's proposal for Custom Element data;
http://mediawiki.blender.org/index.php/BlenderDev/CustomElementData
It could have been used, but that would mean the existing code for
vertexgroup handling and armature deform couldn't be re-used. I guess this
is really a later todo.
a vertex group which will modulate the influence of all bones in the armature.

This commit also tidies up the height of the modifier panels; they should all
have the same size margin now.
The Blur node didn't pass on a buffer when the 'factor' value was not
exactly zero. Tiny values (like 0.0000001) or even negative ones were
still handled by the blur code.
Small fix, but results are at least less frustrating now. It uses the
"compatible euler" function from inserting key positions here, preventing
euler values to be constrainted that differ weirdly.

I've tried several other approaches to get a definite rotate constraint,
but only constraining a single axes seems to me impossible magic still...
The new (months ago) added option for "Local Constraint" always copied
and restored a PoseChannel quaternion, that disabled the required
normalizing of quaternions.

Only visible when you manually draw Ipo Curves, but it's probable that
it showed in other cases too.
Here are my notes on things to look out for as potential problem
spots:

source/blender/blenkernel/intern/displist.c:
+ is initfastshade(void) supposed to be empty? I had
to make it empty to get the merged tree to compile.

source/blender/python/api2_2x/Armature.c:
+ went with the version that had Armature_getLayers()

source/blender/python/api2_2x/Object.c
+ went with the version of Object_getPose() from bf-blender.
(#ifdef 0-ed the other version)

source/blender/python/api2_2x/Pose.[ch]
+ had problems linking due to no Pose_Init() ... copied these
two files straight from bf-blender.

source/blender/src/drawview.c:
+ view3d_panel_properties() had things shifted a few things shifted
a few pixels, otherwise, things were painless

source/blender/src/splash.jpg.c:
+ went with bf-blender version (orange is dead)

source/gameengine:
+ went with bf-blender version -- does not compile due to IMB_rect* stuff,
Ton should look into this.
- adds object.getPose
- ability to manipulate poses /posebones
- fixes a overflow bug in matrix sequence accessor
- adds code to get vec/roll from mat3
- few internal fixes to NLA
- ability to set bone matrices
Works like for Object layers, but local within Armature itself. Each Bone
can be in (16 now) any layer, and the Armature layer defines what is
visible or not. Also note that hiding will still work too.

Since the Blender code is *stuffed* with Bone options now, this commit
requires a good test if all tools we got now comply to layers...
(I counted 130 cases for checking for selected Bones in code!)

In PoseMode; hotkey M will show 'movetolayer' menu. Not in editmode...
then its the mirror menu.

Todo: make action/nla drawing comply to Armature layer settings.
in the game engine again.

All files in source/gameengine/ I've committed below have a comment like
/* XXX note .... */
where something needs to be done. This is pretty straightforward for Erwin,
who has been notified in person too about this. :)
The locality is restricted to action or user-transform only. Or as it goes
in the code now: by setting a constraint local, it executes the constraint
before it calculates the influence of Action or user transforms.

ALso note that this works in Evil Eulerians. Meaning that when you only
want to copy the X,Y or Z compenent of a euler, it can give unpredictable
results when the other euler values are set, this because euler axis
rotations work on top of each other.
- Copy Location Constraint didn't update Object when it was copying from a
  Bone
- Deleting bone in editmode, and connecting bones crashed due to evaluation
  of deformation code (only allowed for pose).
1) Stride Bone

For walkcycles, you could already set an NLA strip to cycle over a path
based on a preset distance value. This cycling happens based on a linear
interpolation, with constant speed.
Not all cycles have a constant speed however, like hopping or jumping.
To ensure a perfect slipping-less foot contact, you now can set a Bone
in an Armature to define the stride. This "Stride Bone" then becomes a
sort-of ruler, a conveyor belt, on which the character walks. When using
the NLA "Use Path" option, it then tries to keep the Stride Bone entirely
motionless on the path, by cancelling out its motion (for the entire
Armature). This means that the animation keys for a Stride Bone have to be
exactly negative of the desired path. Only, at choice, the X,Y or Z Ipo
curve is used for this stride.

Examples:

http://www.blender.org/bf/0001_0040.avi
The top armature shows the actual Action, the bottom armature has been
parented to a Path, using the Stride Bone feature.

http://www.blender.org/bf/0001_0080.avi
Here the Stride Bone has a number of children, creating a ruler to be
used as reference while animating.

Test .blend:
http://www.blender.org/bf/motionblender1.blend

Notes:
- Note that action keys for Bones work local, based on the Bone's
  orientation as set in EditMode. Therefore, an Y translation always
  goes in the Bone's direction.
- To be able to get a "solvable" stride, the animation curve has
  to be inverse evaluated, using a Newton Raphson root solver. That
  means you can only create stride curves that keep moving forward, and
  cannot return halfway.
- Set the Stride Bone in the Editing Buttons, Bone Panel. You can set
  change the name or set the axis in the NLA Window, Strip Properties Panel.
- Files in this commit will move to the blender.org release section.

2) Armature Ghosting

In EditButtons, Armature Panel, you can set an armature to draw ghosts.
The number value denotes the amount of frames that have to be drawn extra
(for the active action!) around the current frame.
Ghosts only evaluate its own Pose, executing it's Actions, Constraints and
IK. No external dependencies are re-evaluated for it.

3) NLA/Action time control

If you click in the NLA window on the action (linked to Object), it makes
sure the Timing as drawn in the Action editor is not corrected for NLA.
If you also set the Object to "Action", this timing will be executed on the
Object as well (not NLA time).
(It's a bit confusing... will make a good doc & maybe review UI!)
1) Target-less IK

If you add an IK constraint without a target set (no object or bone target),
it now can be grabbed and moved with IK, using its own Bone tip or root as
target itself. This way you can use IK for posing, without having the IK
executed while it animates or while a Pose is being solved for real IK.

After grabbing "Target-less IK", it applies the resulted motion in the
pose-channels, which then can be used to insert keypositions.

The Target-less IK bone can still be rotated without IK, also its chain
can be edited as usual.

UI: The CTRL+I menu gives this as an option too. In the 3D window it is
drawn with orangish color.

Note that IK is not resistant to non-uniform scaling yet.

2) Auto-IK

When the option "Automatic IK" is set, in Edit Buttons Armature Panel,
it creates automatic temporal Target-less IK for the Bone you grab or
translate.

The rules are:

- it only works when a single Bone is selected
- if the Bone is a root bone (no parent), it adds IK to the end of the
  chain(s)
- otherwise it adds the IK to the active Bone
- the temporal IK chain only consists of connected Bones.

This method is still a bit experimental. Maybe it should become a special
grabbing option (like SHIFT+G in Pose Mode). It also only works OK for rigs
that fit for it well... when a rig already is fully setup with IK it can't
do much good. :)
In PoseMode, press Wkey or use the Pose pulldown menu. It calculates the
positions of all selected Bone end points, over the time as indicated with
the Scene start/end frame. This then is drawn as a path, with little black
dots on every frame, and a white dot on every 10 frames.

Paths are not saved in files, and not calculated automatic yet on changes.

To make this relative fast, but also reliable, I had to add a new method
in the Dependency graph system, to find exactly (and only) these parents
of an Object that influence its position. This is needed because the path
should show the actual global coordinates of the entire animation system.
The rotation of the parent of the root in an IK chain was included
in the segment's basis, leading to the DoF / rotation limits to be
computed on the wrong basis.
The "Use VGroup" or "Use Envelope" options now are in Modifier Panel
for Armature deform.
If Modifiers are in use, they override the Armature settings for it.
(Cannot get rid of the Armature panel options yet, since Blender still
allows parenting to be deforming too, which is displayed as a Virtual
modifier now)

This now allows to - for example - make a Envelope deform on a Lattice,
and have same Armature use vertexgroups on Mesh.

Next; vertexgroup option for Lattice & Curve deform
editmode" feature. This specific fix only patches the case with armature
deformed meshes & vertex groups.

Note that while in editmode, new created vertices have no weights or
groups assigned, so the result will be unpredictable. This feature should
actually only be allowed for moving vertices around I guess...
memory. Poses should be relinked right after duplicating, not during a
redraw (when more objects use same armature).

Added in readfile a patch to make sure files saved with this duplicate
error can still be used.
conversion of data still. Remains a painful issue to get things converted
and in same time prevent things from calculated twice. :)

Anyhoo, issue was that old files with armatures in hidden layers went wrong
- Undo/Redo didn't work
- Crash on using weightpaint with Armature-modifier (instead of parent).

Note: checking if an object is being deformed cannot be simply done with
checking for a parent anymore... for this a call in modifier.c has been
added; modifiers_isDeformedByArmature(Object *). It even returns the
Armature object pointer.
- on adding armatures, the "use vertexgroup" and "use envelope" options
  are now on.
- fixed ancient bug; on duplicate bone in editmode, it popped to the
  origin of armature, if parent bone was not selected and current bone not
  connected.
- subdivide bones now follows the Mirror edit option too
module -- the previous method could be off pretty far.
- Added drawing of transparent surface for it, instead of just the border.
- Added "stretch IK", allowing bones not only to rotate, but also scale.
  The "Stretch" value below the DoF buttons is used to enabled this.

- Some code tweaking: slightly simplified computation of transform for IK,
  renamed chain to tree, removed unused pchan->ik_mat, ..

Internal IK module work:
- Do damping per DoF also based on stiffness, hopefully makes it converge
  faster with very stiff joints.
- Instead of having two joints types (translational and rotational), now
  all 6 DoF's can be enabled for one joint.
- Added limits for translational joints.
Best is to forget yesterday's commit and old docs. New docs are underway...

Here's how IK works now;

- IK chains can go all the way to the furthest parent Bone. Disregarding
  the old option "IK to Parent" and disgregarding whether a Bone has an
  offset to its parent (offsets now work for IK, so you can also make
  T-bones).
- The old "IK to Parent" option now only does what it should do: it denotes
  whether a Bone is directly connected to a Parent Bone, or not.
  In the UI and in code this option is now called "Connected".
- You can also define yourself which Bone will become the "Root" for an IK
  chain. This can be any Parent of the IK tip (where the IK constraint is).
  By default it goes all the way, unless you set a value for the new IK
  Constraint Panel option "Chain Lenght".
- "Tree IK" now is detected automatic, when multiple IK Roots are on the
  same Bone, and when there's a branched structure.
  Multiple IK's on a single chain (no branches) is still executed as usual,
  doing the IK's sequentially.
- Note: Branched structures, with _partial_ overlapping IK chains, that don't
  share the same Root will possibly disconnect branches.
- When you select a Bone with IK, it now draws a yellow dashed line to its
  Root.
- The IK options "Location Weight" and "Rotation Weight" are relative,
  in case there's a Tree IK structure. These weights cannot be set to
  zero. To animate or disable IK Targets, use the "Influence" slider.
- This new IK is backwards and upwards compatible for Blender files.
  Of course, the new features won't show in older Blender binaries! :)

Other changes & notes;

- In PoseMode, the Constraint Panel now also draws in Editing Buttons, next
  to the Bones Panel.
- IK Constraint Panel was redesigned... it's still a bit squished
- Buttons "No X DoF" is now called "Lock X". This to follow convention to
  name options positive.
- Added Undo push for Make/Clear Parent in Editmode Armature
- Use CTRL+P "Make Parent" on a single selected Bone to make it become
  connected (ALT+P had already "Disconnect").

On todo next; Visualizing & review of Bone DoF limits and stiffness
- Removed old convention that only allowed one "IK" connection for Bones
  in a joint. Was highly frustrating for editing trees or branches.
  In a next commit, there will be a different method to define IK target
  and IK root, so this option actually will become "Connect Bone" or so.

- the IK group name is gone, now is just an option "Tree IK". When IK
  chains share a root they'll form a tree.
  Todo is preventing conflicts here (will be for editor to define IK Root)

- Adding new IK constraint with CTRL+I activates Constraint
Full logs for changes will be added later. Worth to note now;
- support for 'tree IK' added
- DOF and stiffness per IK bone (in pose only)
- Orientation IK support (target rotates -> chain follows)

This is still WIP. Buttons might change, button ranges will change, and the
way 'IK groups' are working will change. You can play with this, but don't
expect saved files to work still by end of this day! :)
deformation options of Armatures, causing bones not to deform.

It was caused by using the old "boneclass" variable and SKINNABLE.
Apparently the boneclass can have any value in older files. Will be killed.

Please note; in files created after last sunday, with setting "No deform" on a
Bone, that setting has to be done again.
- Armature deform options "Envelope" and "Vertexgroup" didn't combine. One
  Vertexgroup added disabled all Envelopes
- "Clear" option in WPaint Panel now sends refresh to deform
- Same for Undo in Wpaint
Armature Panel
- "Vertex Groups"
- "Envelope"

Bones Panel
- "Mult"

The logic works as follows;
- Set "Vertex Groups" will enable vertex group based deform (default)
- Set "Envelope" will enable Bone Envelopes to deform
- Set both will apply Envelope deform on vertices without VertexGroups

- Set the per-Bone "Mult" option to have Envelopes work on top of a
  VertexGroup
- The per-Bone "Deform" option (was called "Skinnable") will dis/enable
  the Bone to deform for all situations.

The old convention was that, without any vertex groups, the Bones deformed
with bone-distances. I can't patch that... so you have to enable it by
hand in older files. Not too bad, since this option was unusable before
anyway. :)
This works pretty nice for better control over the curvature of any bone
deform. No need to give Bones (vgroups) large influence, just add a coupleof B-bone segments.

Two notes;
- The Bone property "Segments" defines if a deform happens as a 'B-bone'.
  The drawtype B-bone is just for display in 3d window.
- A B-bone also deforms (bends) in Rest-position, if there's a joint that
  creates a curved Bone. Therefore, best results you get by creating a
  rest-position with straight joints. Or, if you prefer a slightly bended
  restposition (for a spine or so), make sure the Mesh model is *not*
  curved, the B-bone will do this for you.

Also added: proper events on changing buttons for Bones, like "Segm" or
"Dist" etc.
- The "Skinnable" option for Bones now is taken into account for the
  Envelope drawmode. If not Skinnable, it also doesn't draw the soft
  deform area. Maybe bone should be hidden... dunno yet.
- Use CTRL+LMB in weightpaint mode to sample the weight in a mesh.
  Note; it returns the weight of the closest visible vertex, not of a
  Blended result.
- NKey Panel for Mesh edit now shows a menu with the VertexGroup name(s)
  of a selected Vertex, plus the Weight.

Fix:
- while scaling Bone points in editmode (Envelope drawtype), the Bone
  root scale was not copied from (or to) the parent tip. This was not
  visible (is not drawn) but deform did use it... causing weird errors.
  For those who saw this error today: just go into editmode, select all
  Bones, press Skey, enter. That fixes it :)