- Removing Shape Keys didn't free drivers
- The sample file had Shapekeys in a weird order (should be sorted on shape
  index number). How this could have happened is unknown, probably a script.
  For the time being added a version patch to check on this after reading
  a file. If wrong ordered, it gives warning prints.
Using the Library Append "at cursor" option went wrong;
- it moved all selected objects to cursor position
- it didn't even check what was imported...

Both issues are fixed now.
If you rename a Constraint, the used Constraint Channels (Ipo curves) were
not renamed as well, making animations not work anymore.

Now renaming works up to this level:
- own object constraints
- own object Action constraints

This is identical to Bone renaming. Note that other actions (like in NLA)
are not corrected for renaming. Have to look at ways to provide that once.
- FORWARD CYCLING & MATCHING
Up to no now, adding multiple actions in NLA with walkcycles required to
animate them standing still, as if walking on a conveyor belt. The stride
option then makes the object itself move forward, trying to keep the foot
stuck on the floor (with poor results!).
This option now allows to make walk cycles moving forward. By
indicating a reference Offset Bone, the NLA system will use that bone to
detect the correct offset for the Armature Pose to make it seamlessly going
forward.
Best of all, this option works as for cyclic Action Strips as well as for
individual Action Strips. Note that for individual strips, you have to set
the strip on "Hold". (Might become automatic detected later).
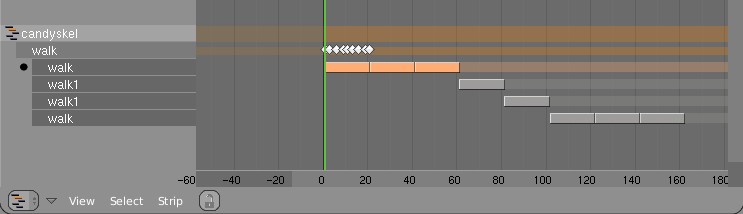
Here's an example edit image for NLA:
http://www.blender.org/bf/nla_match-cycle.jpg
And the animation for it:
http://download.blender.org/demo/test/2.43/0001_0150_match.avi
Blender file:
http://download.blender.org/demo/test/2.43/mancandy_matching.blend
Using this kind of cycling works pretty straightforward, and is a lot
easier to setup than Stride Bones.
To be further tested:
- Blending cycles
- matching rotation for the bones as well.
- ACTION MODIFIERS (motion deformors)
The above option was actually required for this feature. Typically walk
cycles are constructed with certain Bones to be the handles, controlling
for example the torso or feet.
An Action Modifier allows you to use a Curve Path to deform the motion of
these controlling bones. This uses the existing Curve Deformation option.
Modifiers can be added per Action Strip, each controlling a channel (bone)
by choice, and even allows to layer multiple modifiers on top of each other
(several paths deforming motion). This option is using the dependency graph,
so editing the Curve will give realtime changes in the Armature.
The previous walkcycle, controlled by two curves:
http://download.blender.org/demo/test/2.43/0001_0150_deform.avi
Blender file:
http://download.blender.org/demo/test/2.43/mancandy_actiondeform.blend
Action Modifiers can be added in the NLA Properties Panel. Per Modifier you
have to indicate the channel and a Curve Object. You can copy modifiers from
one strip to another using CTRL+C (only copies to active Object strips).
Setting up a correct Curve Path has to be carefully done:
- Use SHIFT+A "Curve Path" in top view, or ensure the path is not rotated.
- make sure the center point of the Curve Object is at the center of the
Armature (or above)
- move the first point of the curve to the center point as well.
- check if the path starts from this first point, you can change it using
(in Curve EditMode) the option Wkey -> "Switch Direction"
- Make sure alignment uses the correct axis; if the Armature walks into
the negative Y direction, you have to set in Object Buttons, "Anim settings"
Panel, the correct Track option. (Note; option will probably move to the
Modifier later).
This is a good reason to make such paths automatic (on a command). Is on the
todo list.
Also note this:
- the Curve Path extends in beginning and ending, that's (for now) the default,
and allows to use multiple paths. Make sure paths begin and end horizontal.
- Moving the Curve in Object Mode will change the "mapping" (as if the landscape
a character walks over moves). Moving the Curve in Edit Mode will change the
actual position of the deformation.
- Speed (Ipos) on paths is not supported yet, will be done.
- The Curve "Stretch" deform option doesn't work.
- Modifiers are executed *after* all actions in NLA are evaluated, there's no
support yet for blending multiple strips with Modifiers.
- This doesn't work yet for time-mapping...
This commit is mostly for review by character animators... some details or
working methods might change.
This feature can also be used for other modifiers, such as noise (Perlin) or
the mythical "Oomph" (frequency control) and of course Python.
Special thanks to Bassam & Matt for research & design help. Have fun!
settings, rather than using the object's TrackX/Y/Z/etc buttons.

 This is good for two reasons: a) having the settings over in the object buttons
 before was terribly unintuitive and hidden, now it's more visible how to
 control the deformation, and b) now if you have more than one curve modifier,
 they can have their own settings, instead of being forced to use the object
 level data.
Customizable Grid Subdivisions

This commit adds a numbut to the View Properties panel that lets you specify how the grid is subdivided.

This affects snapping in translations, obviously.

Default: 10 (behavior doesn't change)

That means people still stuck in feet and inches (shudders) can set it to 12 and have 1 unit = 1 foot.

That also means you can work in "heads" when doing body proportions or whatnot (don't think of it as being limite to "CAD" uses).
Full log:
http://www.blender3d.org/cms/Irregular_Shadow_Buffe.785.0.html

In short: this is a shadow buffer approach that always results in crispy
shadows, independent of lamp buffer size or zoom level. This shadow buffer
system also supports transparent shadow.

This is part of work on refreshing Shadow Buffers in Blender. You now can
choose of two types (Classical, Irregular). More types will follow. Also
quality issues for Classical shadow buffers are going to be reviewed,
especially to solve the lousy Biasing.

For the CVS log record; it is based on articles:
Gregory Johnson et al, University of Texas, Austin. (Regular grid method).
Timo Aila and Samuli Laine, Helsinki University of Technology. (BSP method).
file was also happening on files made with current CVS (until next release).
Added a simple check to make it only happen on old files where there was no
radius before.
feature. Old files that had "sticky" set would not show "sticky" under
the new system. Not that anyone ever actually used "sticky".

Also, these commits only add support for rotated external target objects,
not target bones inside the same armature.
file path where library is read from.

In Outliner, choose new view mode "Libraries". A ctrl+click on the library
name then allows to change the file name or path. Note that when you change
the file name, nothing is being re-read or re-linked. Only after saving the
.blend file and reading it back the new library is used.

This feature allows to cleanup library usage. You can make files relative,
or reorganize a project. Just keep in mind that you cannot use this feature
to fix .blend files that link to non-existing other files. That because the
lost data is actually not read at all, so cannot be saved either.

Currently, library errors are only printed in the console... quite
important to keep track of when using Libraries.

Implementation note: this Outliner view mode can become expanded to a full
"Database view", showing something similar as SHIFT+F4 databrowse does now.
In a quick glance: (temp image)
http://www.blender.org/bf/rt.png

Main reason is that Lattices are useful a lot for Armature deformation.
Lattices just provide much more precise and interesting control. However,
with only bone envelopes it's very hard to use.

Working with Lattice vertex groups is nearly identical to Mesh:
- on CTRL+P 'make parent' you can choose the deform option now
- In editmode, the buttons to control vertex groups are available
- In outliner you can select vertexgroups too
- Deforming Lattices with Armatures has all options as for Mesh now.

Note:
- No WeightPaint has been added yet. To compensate, the editmode
  drawing for a Lattice with vertex group shows weight values for the active
  vertex group.
- Lattice editmode doesn't undo/redo weight editing yet.
- Softbody for Lattice still uses own vertex weights

Implementation notes:
- derivedmesh weight_to_rgb() is now exported to drawobject.c
- been doing cleanups in code (order of includes, var declarations, etc)
- weightpaint button handling now is generic

I've checked on Brecht's proposal for Custom Element data;
http://mediawiki.blender.org/index.php/BlenderDev/CustomElementData
It could have been used, but that would mean the existing code for
vertexgroup handling and armature deform couldn't be re-used. I guess this
is really a later todo.
New toolsettings variable "select_thresh" was not initialized. This caused
the option "similar normals" to not work really (uses a dot product).

It now is initialized (scene.c) as well as corrected in do_versions for
saved files.
- ImagePaint now uses ImBuf directly, and the rect blending functions
  were moved into the imbuf module.
- The brush spacing, timing and sampling was abstracted into brush.c, for
  later reuse in other paint modes.

Float ImagePaint support.

Textured Brushes:
- Only the first texture channel is used now.
- Options for size and offset should be added, but need to find some space
  in the panel, or add a second one ..
- Added a new Brush datablock, only used by image paint, but intended
  to be used in texture paint, vertex paint, weight paint and sculpt
  mode also.
- Being a datablock, these brushes can be saved, appended and linked.
  They have a fake user by default, to make sure they are saved even if
  not selected.

Image Painting:

- Replaced the img module with C code in imagepaint.c
- Airbrush is no longer a separate tool, but rather an option that can
  be used for soften, smear and clone also.
- Blend modes mix, add, subtract, multiply, darken and lighten have been
  added, code taken directly from vertex paint.

Note to project files maintainers:

- The img module was removed from SCons and Makefiles, and this should
  be done in other build systems also. I'll wait to remove the module
  from cvs, to not break compilation.
- readfile.c, version patch for new toolsettings used a malloc, using
  unitialized variables
- despgraph, another malloc changed to calloc
- timer code for render ESC: unitialized variable in struct
- AO "Use Distances" can not use 'sky texture' for colors, that bug was
  fixed in UI (prevent settings to combine), but better also gets fixed
  on reading files.

- Backbuf render, when not existed, didn't initialize backdrop color to 0.
Group appending issue: the rules for how this works were still confusing.
In some cases you want the objects in the scene itself, in others not.

New method:

- when you append a group directly (shift+f1 -> group -> name(s)) it
  will both append the group and link objects to the current scene
- in all other cases it will only append a group itself.
  (means, you can then use "Add group" to see it).
naming convention for Compositing:

- Render Result node -> Render Layers node (name only appears in Add menu)
- Compositor image -> Viewer Node image

I've also added a version patch (2.41 saved files only) to rename existing
"Compositor" Images.
The buttons uiBlock was stored in a Node, for retrieval of node buttons,
however that won't work when multiple windows show same Nodes.
Now implemented more correct unique Block names (as all over in UI), and
use that name to retrieve buttons with API call uiGetBlock().
- removed "Unified" button, replaced with "HD" preset for 1920x1080 output
- removed the unused "Pass" options
- removed the unused "Strands" render-layer option

Because the internal render pipe supports this already; added two more
render-layer options:

- "Sky", to enable/disable sky render in a layer (this was part of "Solid"
  before, not so correct... to ensure previously saved files work, the
  "Sky" option is set by default when "Solid" was set. The version patching
  will do this temporally always, until we've bumped up version to 2.42
- "Edge", to enable/disable edge render in a layer. Nice for compositing.

Also in this commit: fixed warnings for exported functions for the new
Node Editor pull-down menus.
NOTE: stucci didn't return 'intensity' since blender 1.0, something that
alsways caused headaches all over (all other textures do per definition).
But, allowing stucci to return 'intensity' would break old files.

To make it work for preview, I had to solve this once. Done with a version
patch, so old files (including current 2.41!) won't read with color channel
active for Stucci textures.

(Preview.blend I saved as a 2.42 file btw!)
Files saved with new cloth modifier patch crash in cvs blender. (#define
for cloth is 13 even!). This was caused by lack of upward compatibility
for non existing modifiers.

Also added giant warning in code for the ENUM for modifier types.
Mixdown option (blending sequence audio strips) didn't write proper WAV.
- file length in header chunk was too short (potential crasher)
- endian switch code used swab(), which wasn't defined to work when src and
  target is identical
- cleaned up some code too... like removing timecursor() for core loop.
Next to the "DispWindow" there are now two new choices:

- Display render output to Image Editor
- Display render output to Screen-sized Image Editor

Both options won't open a 2nd window anymore, which makes work quite more
smooth even, especially because 'focus' isn't lost. Further it fits in the
'single window UI' paradigm of Blender. Should have been done 10 years ago!

Lastly it might bypass issues with X11... having 2 windows with opengl
context is not always stable in Linux.

This option uses an identical trick as for the Compositor viewer, using an
Image block with a fixed name ("Render Result").

The flow, when invoking a Render, goes as follows:
- first it checks if there's an Image Editor visible displaying the "Render
  Result", if so then it uses that area-window.
   (Use this option for dual-monitor setups for example, a render will always
   go to the same location then)
- else it checks if there's an Image Editor open in general, it then
  assigns that window the "Render Result" Image.
- else: it searches for the largest Area in the screen, and turns that into
  a temporal Image Editor showing render output.

After a render, an ESC will push back the former view, if the Area type has
changed.

Same rules apply for the "Full Screen" option. Here an ESC will always go
back to the regular Screen, and restore Area type if required.

While rendering, the queue for the renderwindow isn't handled yet, so you can
not zoom (nor get full redraws), as for the regular render window.

Existing conflicts:
- in FaceSelect mode, the Image editor enforces to display the face texture
  after rendering again.
- when using an Image window for compositing, you'll lose the Viewer output
  on a render.

Implementation note:
While rendering updates, nothing is drawn in frontbuffer anymore. That's
good news for b0rked OpenGL drivers (and faster). However, for the few
OpenGL cards that don't do a "swap copy" but a "swap exchange" you get
issues... has to be worked on. I'm afraid we have to drop frontbuffer
drawing altogether.

Other fixes:

- Hotkeys NumPad 1, 2, 4, 8 will set zoom levels (was half coded only?)
  Use SHIFT to zoom out (smaller).

- Rendering Tile updates still had draw errors on edges of tiles, in OSA
  only. (Caused by commit 4 days ago)
The Scene audio.mixrate variable was zero on creating new scenes, causing
synced playback to fail.
Added initialize in kernel, and patch in buttons drawing to set the value
for wrongly saved files.

(Pixelshading: small correction for more optimal code)
This code enables IPO-pinning for Sequence-strips again, by working
around the missing libdata in blenloader/intern/readfile.c.

Bad hack(tm). Maybe we find a way, to make Sequence-strips true libdata?

It also fixes two places in IPO-editing where frame-locking wasn't handled.
Appending a Scene, which had group-objects, accidentally linked these
objects to the active scene too. This was a mixup with the case of just
appending a group.
- code was on wrong location, all version patches should be grouped,
  otherwise we completely lose track!
- code didn't use the WOPHY_BULLET define...
- made more clear comment on meaning of version patch
- Made another attempt to migrate from Sumo to Bullet: import of older files automatically switch to Bullet, but you can override it, and save the file in 2.42 version. then it stays Sumo physics.
Patch #4044 patch to change the step when changing frame with up or down arrow keys.

This adds a per Scene setting to specify the number of frames skipped by the up and down arrow.
This setting can be changed in the Timeline header and in the Anim/Playback section of the Scene settings.

Upon loading a file without that setting or creating a new scene, it is set to 10

Also fixed the Start and End frame buttons in the Scene buttons to do a proper refresh.
Stored selections now get saved to mesh library blocks as direct data.
The idea that stored selections are 'erased' when leaving editmode and
switching objects is pretty mysterious for the user. Note that currently
the mselect array in a mesh is not written to file.  Not sure whether
to change this or not.