This commit fixes the Draw module.  All buttons/widgets created via the Draw
module in a SpaceScript area are now inserted into a global list attached to
the SpaceScript data.  This list is cleared before each draw, when freeing
the space, and when the area is switched to another space.c

This is necessary to prevent Blender's internal UI code from getting invalid
pointers to python data.  In addition, it allows storing widget tooltips
inside the python Button objects, which solves that little bit of stupidity.

Note that this reverts the previous weaklist solution.  In fact, I had to go
over each previous commit by Campbell after this code originally branched
before the weaklist commit and re-add each commit.  So if anything is
missing, just tell me, or feel free to re-add it.
This commit adds a new constraint to Blender: the Transformation Constraint. This constraint gives you more freedom to choose how transforms are copied from one object/bone to another object/bone.

You can assign the Loc/Rot/Scale channels of a source to the Loc/Rot/Scale channels of a destination, specifying the range of motion (per axis) from the source to consider, and the range of motion (per axis) that will be applied to the destination. Also, for each destination axis, you can choose which of the source axes to copy from.

A similar constraint was coded by Jason Blary (snark), as Patch #4991. This constraint is basically rewritten from scratch, although there are some elements of the original patch which may be borrowed in future.

Various notes:
* PyAPI access has been coded.
* Space conversion is also enabled for this constraint.
* Also the useless get_constraint_col function has been removed
* Doing a rotation copy with a ratio that is not 1:1 doesn't always work correctly yet (like for the Copy Rotation constraint).
After just over a week of coding, I've finished doing a major refactor/cleanup of the constraints code. In the process, quite a few old kludges and ugly hacks have been removed. Also, some new features which will greatly benefit riggers have been implemented.

=== What's New ===
* The long-awaited ``ChildOf Constraint'':
This allows you to animate parent influences, and choose which transformation channels the parent affects the child on (i.e. no translation/rotation/scaling). It should be noted that disabling some combinations may not totally work as expected. Also, the 'Set Inverse' and 'Clear Inverse' buttons at the bottom of this constraint's panel set/clear the inverse correction for the parent's effects. Use these to make the owner not stick/be glued to the parent.
* Constraint/Target Evaluation Spaces:
In some constraints, there are now 1-2 combo boxes at the bottom of their panel, which allows you to pick which `co-ordinate space' they are evaluated in. This is much more flexible than the old 'local' options for bones only were.
* Action Constraint - Loc/Rot/Size Inputs
The Action Constraint can finally use the target's location/rotation/scaling transforms as input, to control the owner of the constraint. This should work much more reliably than it used to. The target evaluation should now also be more accurate due to the new space conversion stuff.
* Transform - No longer in Crazy Space (TM)
Transforming objects/bones with constraints applied should no longer occur in Crazy Space. They are now correctly inverse-corrected. This also applies to old-style object tracking.

=== General Code Changes ===
* solve_constraints is now in constraints.c. I've removed the old `blend consecutive constraints of same type' junk, which made the code more complex than it needed to be.
* evaluate_constraint is now only passed the constraint, and two matrices. A few unused variables have been removed from here.
* A tempolary struct, bConstraintOb, is now passed to solve_constraints instead of relying on an ugly, static workobject in some cases. This works much better.
* Made the formatting of constraint code consistent
* There's a version patch for older files so that constraint settings are correctly converted to the new system. This is currently done for MajorVersion <= 244, and SubVersion < 3. I've bumped up the subversion to 3 for this purpose. However, with the imminent 2.45 release, this may need to be adjusted accordingly.
* LocEulSizeToMat4 and LocQuatSizeToMat4 now work in the order Size, Rot, Location. I've also added a few other math functions.
* Mat4BlendMat4 is now in arithb. I've modified it's method slightly, to use other arithb functions, instead of its crazy blending scheme.
* Moved some of the RigidBodyJoint constraint's code out of blenkernel, and into src. It shouldn't be setting its target in its data initialisation function based + accessing scene stuff where it was doing so.

=== Future Work ===
* Geometry to act as targets for constraints. A space has been reserved for this already.
* Tidy up UI buttons of constraints
This commit should fix some seemingly random crashes broken and I have been experiencing while editing armatures.

A backtrace revealed that autosave was choking on the PoseChannels that didn't have a Bone assigned to them. This was caused by the bone duplication code making a new PoseChannel for a duplicated bone, but that new bone not getting assigned to the PoseChannel yet, as the user was still in EditMode.
At last! The ability to code constraints in Python. This opens up many interesting rigging possibilities, as well as making prototyping constraints easier.

* A PyConstraint script must begin with the line
#BPYCONSTRAINT
* It must also define a doConstraint function, which performs the core actions of the constraint.
* PyConstraints use IDProperties to store custom properties for each PyConstraint instance. The scripter can choose which of these ID-Properties to expose to a user to control the behaviour of the constraint. This must be done using the Draw.PupBlock method.

Credits to Joe Eager (joeedh) for coding the original patch on which this is based. I've made heavy revisions to large parts of the patch.

For more detailed information, and some demo scripts, see the following page:
http://aligorith.googlepages.com/pyconstraints2
* Moved the multires vertex data from struct MultiresLevel to struct Multires. There's no longer any reason to store data seperately for each level; it was just taking up extra memory.

* Incremented the subversion to 2 and adjusted do_versions to correctly load older files.

* Refactored the multires update process (which handles propagating changes to other levels)
This (new) constraint limits the location of an object/bone to the range of locations
on a given curve. It works by comparing the location of the owner on one axis, to
the extents of the curve's bounding-box on the same axis, to find the location on
the curve.

Usage Notes:
* 'Ob:' field must point to a valid curve object
* This curve should have 'Path' turned on in order for this constraint to work. You
don't really need to do this as it will be taken care of by the code.
* 'Auto' toggle automically determines which axis should be used for the distance estimations/calculations. It is the default option, but may not work that well for
some cases.
* X/Y/Z toggles can be used to select the axis to use for these calculations. Try
to choose the axis along which the curve stretches out for most.

Python Notes:
Python API access for this constraint is not included in this commit. Will be coming
soon.
- New Softbody panel now is named "Soft Body Collision" (instead of II)
  Also made it start tabbed, and made Fluids panel start untabbed.

- Infowindow: skip drawing buttons when width is smaller than 320 pixels.
Saving in sculpt mode with partial visibility would give "not enough
diskspace" errors. That wasn't the error at all though, but blender
gives this diskspace error message on any error (this is for another
commit to fix though).

The cause of the error was that with partial visibility it saved the
MEdge and MFace arrays as if they had the full length, which is not
the case, so it was reading past the end of the array. I added an
exception for these.

Also removed the oldstyle tface saving, this was only there to provide
temporary upward compatibility until release.
Partial fix for bug #5771, Multires tool deletes crease flags on edges

* Modified the edge flags code to support all of the edge flags (not just seams.)
* Added a new array to the Multires struct to store creases.
* For Mark Sharp, Clear Sharp, and Crease, displays an error if applied to a multires mesh not on level 1.
Changes to CustomData:
Some functions would only return the current active layer, added extra variants that take an index to select the level (modeled after CustomData_get_layer_n.)

Still todo:
* UVs are being interpolated linearly, should probably offer Catmull-Clark subdivision like Subsurf modifier.
* Vertex Colors still don't support multiple customdata layers.
* Editing UV data on levels other than 1 should be disabled in the interface (same for weights)
although it has a lot of noise. Not to mention our bad string code gives
a load of warnings.

I've reviewed specifically:
- file reading/write
- dna and library code
- node system
- entire render module

Done a couple of files in src/ too, seemed to be nice errors.
Although we will delay the main Rigid Body user interface after 2.43 release early 2007, I need some constraint data/UI to make progress with COLLADA Physics.
Added RigidBody constraint UI
LR_ALTKEY+LR_CTRLKEY+LR_SHIFTKEY+ P will bake rigidbody
Contribution by RCRuiz, Ramon Carlos.
freed. Windows nicely crashes then.

Also: added human readable string in fileglobal, so you can check the
subversion in a file manually too. Rule:
- Find GLOB chunk (first chunk after REND now)
- skip sizeof BHead, 20 bytes in 32bits, or 24 in 64 bits
- there's 4 characters showing subversion, right now it reads "   1".
Next to the release code, a subversion number is written in the file
now. This is in the chunk GLOB, which is now in beginning of file.

Subversions can be used to have finer control over do_versions(), so you
don't have to wait for a release to patch stuff nicely. We can also
increase these subversions regularly to denote important changes.
If a subversion is not 0, it's being printed in the header, so a user can
also verify the state. (We might even tag cvs for it?).

Next to this, a minimum version and subversion number are written too.
From now on, if you change files in a way a past binary cannot read this
nicely anymore, you should set these minima to the current version.
This was especially added for the new mesh layers, which will not work
for older binaries once we make 2.43.
library .blend files anymore, making it a load faster to use.

- Fixed ancient annoyance; samples were not properly freed, giving a lot
  "Error Totblock" when using sound.
  This fix also involves removing an ancient NaN hack, which treated the
  samples as fake Library data in the Main database.
  But still, the Blender Sound and Sample code is horrible... :/
All data layers, including MVert/MEdge/MFace, are now managed as custom
data layers. The pointers like Mesh.mvert, Mesh.dvert or Mesh.mcol are
still used of course, but allocating, copying or freeing these arrays
should be done through the CustomData API.

Work in progress documentation on this is here:
http://mediawiki.blender.org/index.php/BlenderDev/BlenderArchitecture/CustomData


Replaced TFace by MTFace:

This is the same struct, except that it does not contain color, that now
always stays separated in MCol. This was not a good design decision to
begin with, and it is needed for adding multiple color layers later. Note
that this does mean older Blender versions will not be able to read UV
coordinates from the next release, due to an SDNA limitation.


Removed DispListMesh:

This now fully replaced by DerivedMesh. To provide access to arrays of
vertices, edges and faces, like DispListMesh does. The semantics of the
DerivedMesh.getVertArray() and similar functions were changed to return
a pointer to an array if one exists, or otherwise allocate a temporary
one. On releasing the DerivedMesh, this temporary array will be removed
automatically.


Removed ssDM and meshDM DerivedMesh backends:

The ssDM backend was for DispListMesh, so that became obsolete automatically.
The meshDM backend was replaced by the custom data backend, that now figures
out which layers need to be modified, and only duplicates those.


This changes code in many places, and overall removes 2514 lines of code.
So, there's a good chance this might break some stuff, although I've been
testing it for a few days now. The good news is, adding multiple color and
uv layers should now become easy.
This commit adds file reading/writing of ID properties to all ID types,
and also adds python access for NMesh, Mesh, Scene and Image.  Note
that the file reading code might need some more work for certain
future/planned features to save right.  Also I updated a few comments in idprop.c.
This commit adds supports for per-ID properties to blender.
See http://mediawiki.blender.org/index.php/BlenderDev/ID_Property
for more information on how it all works.

ID properties are accesable by python; but note that
bindings have only been added to Object and Material thus
far.  However adding more bindings is easy and I plan
on adding several more hopefully within an hour of this inital
commit.

A generic UI panel is also planned, that will go wherever its
needed; for example in the material buttons, editing buttons, etc.
I'll likely submit the initial code for that as a patch, though,
so matt and ton and others can go over it and make sure it's
all good. :)

VERY important, if you intend to use ID properties please
go to http://mediawiki.blender.org/index.php/BlenderDev/PropertyStandards
and start writing the appropriate standards for it.
A Plumiferos wishlist item: Markers working in the Action Editor too.

* The user can choose between displaying the scene markers (i.e. the
markers shown in the timeline) or the markers specific to each action,
by using the next list box on the action editor header. This is specific
to each instance of the action editor.

* The display of the markers currently still needs improvement. At the
moment, the triangle icons + text are drawn below all the last row of
keyframes. As such, I've made it draw yellow vertical lines which
span the height of the action editor, to also indicate markers.
Comments on this and also help getting the triangle thingies to 'float'
above the bottom scroll bar are warmly appreciated.

* There are a few minor update issues with editing a marker in the
timeline and the markers in the action editor which will be fixed soon.

* There are also a few hotkeys to still add.

Enjoy!
Major sequencer rewrite to add Speed Control effect.
Changes:
- Cleaned up large parts of sequence.c removing a lot of unnecessary code.
  (We first built old seqar array to decide, what is visible, then build
   dependencies with new code, then used old code to iterate through the
   strips and deciding using new code what is used and so forth and so on...)
  Should be much faster now.
- Now we build the strips recursively thereby elemenating the need of a
  seperate dependency calculation.
- Added a Speed-Control effect to change strip speed afterwards.
  (Offers global speed as well as IPO-controlled speed.
   There are several modes to play with:
   - Control by velocity (IPO = velocity where 1.0 is normal speed)
   - Control by frame number (IPO = target frame)
   - IPO-Value can be rescaled to frame-value, to make frame exact matching
     possible. (Matching video tracks to audio tracks with IPOs ;-)

Demo-Blend file is here http://peter.schlaile.de/blender/sequencer/speedcontroltest.blend

Since this was also a Plumiferos request I hope to be mentioned in the
credits ;-)

Enjoy! And please test the new sequencer thoroughly. It is really more like
a rewrite this time.
THE OBJECT PROXY

Or simple said; local control of referenced data from libraries.
Having library files with references is a very common studio setup, and
Blender did do quite well in that area. Were it not that for character
setups it was impossible to use still.

This commit will enable a full rig+character to remain in the library,
and still have - under strict control - local access for animation edits.

Full log:
http://www.blender3d.org/cms/Proxy_Objects.824.0.html
This adds support for "generator effect strips", which don't need necessarily
an input strip and my version of Matt Ebb's [ #5035 ] 'Solid Color'
sequence strip.

TODO: With a little bit more tweaking it will be possible to make animated
effect plugins and my still unfinished "Bake"-Strip.

For the 'Solid Color'-Effect, to quote Matt:
This is nice and simple, just provides a solid colour that's set in a colour picker in the properties popup. This is something we've needed for a long time, and I got totally sick of having to make 'black.png' and 'white.png' just to do fades, so I coded this.
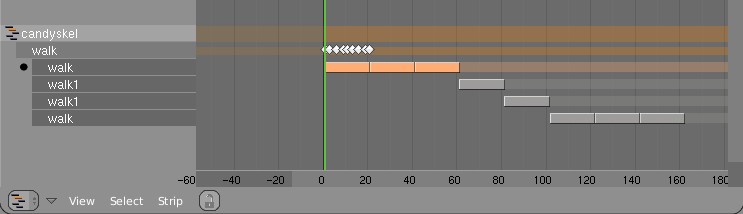
- FORWARD CYCLING & MATCHING

Up to no now, adding multiple actions in NLA with walkcycles required to
animate them standing still, as if walking on a conveyor belt. The stride
option then makes the object itself move forward, trying to keep the foot
stuck on the floor (with poor results!).
This option now allows to make walk cycles moving forward. By
indicating a reference Offset Bone, the NLA system will use that bone to
detect the correct offset for the Armature Pose to make it seamlessly going
forward.

Best of all, this option works as for cyclic Action Strips as well as for
individual Action Strips. Note that for individual strips, you have to set
the strip on "Hold". (Might become automatic detected later).

Here's an example edit image for NLA:
http://www.blender.org/bf/nla_match-cycle.jpg
And the animation for it:
http://download.blender.org/demo/test/2.43/0001_0150_match.avi
Blender file:
http://download.blender.org/demo/test/2.43/mancandy_matching.blend

Using this kind of cycling works pretty straightforward, and is a lot
easier to setup than Stride Bones.

To be further tested:
- Blending cycles
- matching rotation for the bones as well.

- ACTION MODIFIERS (motion deformors)

The above option was actually required for this feature. Typically walk
cycles are constructed with certain Bones to be the handles, controlling
for example the torso or feet.
An Action Modifier allows you to use a Curve Path to deform the motion of
these controlling bones. This uses the existing Curve Deformation option.
Modifiers can be added per Action Strip, each controlling a channel (bone)
by choice, and even allows to layer multiple modifiers on top of each other
(several paths deforming motion). This option is using the dependency graph,
so editing the Curve will give realtime changes in the Armature.

The previous walkcycle, controlled by two curves:
http://download.blender.org/demo/test/2.43/0001_0150_deform.avi
Blender file:
http://download.blender.org/demo/test/2.43/mancandy_actiondeform.blend

Action Modifiers can be added in the NLA Properties Panel. Per Modifier you
have to indicate the channel and a Curve Object. You can copy modifiers from
one strip to another using CTRL+C (only copies to active Object strips).

Setting up a correct Curve Path has to be carefully done:
- Use SHIFT+A "Curve Path" in top view, or ensure the path is not rotated.
- make sure the center point of the Curve Object is at the center of the
  Armature (or above)
- move the first point of the curve to the center point as well.
- check if the path starts from this first point, you can change it using
  (in Curve EditMode) the option Wkey -> "Switch Direction"
- Make sure alignment uses the correct axis; if the Armature walks into
  the negative Y direction, you have to set in Object Buttons, "Anim settings"
  Panel, the correct Track option. (Note; option will probably move to the
  Modifier later).

This is a good reason to make such paths automatic (on a command). Is on the
todo list.

Also note this:
- the Curve Path extends in beginning and ending, that's (for now) the default,
  and allows to use multiple paths. Make sure paths begin and end horizontal.
- Moving the Curve in Object Mode will change the "mapping" (as if the landscape
  a character walks over moves). Moving the Curve in Edit Mode will change the
  actual position of the deformation.
- Speed (Ipos) on paths is not supported yet, will be done.
- The Curve "Stretch" deform option doesn't work.
- Modifiers are executed *after* all actions in NLA are evaluated, there's no
  support yet for blending multiple strips with Modifiers.
- This doesn't work yet for time-mapping...

This commit is mostly for review by character animators... some details or
working methods might change.
This feature can also be used for other modifiers, such as noise (Perlin) or
the mythical "Oomph" (frequency control) and of course Python.

Special thanks to Bassam & Matt for research & design help. Have fun!
In a quick glance: (temp image)
http://www.blender.org/bf/rt.png

Main reason is that Lattices are useful a lot for Armature deformation.
Lattices just provide much more precise and interesting control. However,
with only bone envelopes it's very hard to use.

Working with Lattice vertex groups is nearly identical to Mesh:
- on CTRL+P 'make parent' you can choose the deform option now
- In editmode, the buttons to control vertex groups are available
- In outliner you can select vertexgroups too
- Deforming Lattices with Armatures has all options as for Mesh now.

Note:
- No WeightPaint has been added yet. To compensate, the editmode
  drawing for a Lattice with vertex group shows weight values for the active
  vertex group.
- Lattice editmode doesn't undo/redo weight editing yet.
- Softbody for Lattice still uses own vertex weights

Implementation notes:
- derivedmesh weight_to_rgb() is now exported to drawobject.c
- been doing cleanups in code (order of includes, var declarations, etc)
- weightpaint button handling now is generic

I've checked on Brecht's proposal for Custom Element data;
http://mediawiki.blender.org/index.php/BlenderDev/CustomElementData
It could have been used, but that would mean the existing code for
vertexgroup handling and armature deform couldn't be re-used. I guess this
is really a later todo.
- ImagePaint now uses ImBuf directly, and the rect blending functions
  were moved into the imbuf module.
- The brush spacing, timing and sampling was abstracted into brush.c, for
  later reuse in other paint modes.

Float ImagePaint support.

Textured Brushes:
- Only the first texture channel is used now.
- Options for size and offset should be added, but need to find some space
  in the panel, or add a second one ..
- Added a new Brush datablock, only used by image paint, but intended
  to be used in texture paint, vertex paint, weight paint and sculpt
  mode also.
- Being a datablock, these brushes can be saved, appended and linked.
  They have a fake user by default, to make sure they are saved even if
  not selected.

Image Painting:

- Replaced the img module with C code in imagepaint.c
- Airbrush is no longer a separate tool, but rather an option that can
  be used for soften, smear and clone also.
- Blend modes mix, add, subtract, multiply, darken and lighten have been
  added, code taken directly from vertex paint.

Note to project files maintainers:

- The img module was removed from SCons and Makefiles, and this should
  be done in other build systems also. I'll wait to remove the module
  from cvs, to not break compilation.
At long last!
This new constraint is pretty simple. Following in the footsteps of such giants as Copy Loc and Copy Rot, it lets you constrain the size of an object/bone to another object/bone, with per axis restrictions.
-> Rendering in RenderLayers
It's important to distinguish a 'render layer' from a 'pass'. The first is
control over the main pipeline itself, to indicate what geometry is being
is rendered. The 'pass' (not in this commit!) is related to internal
shading code, like shadow/spec/AO/normals/etc.
Options for RenderLayers now are:
- Indicate which 3d 'view layers' have to be included (so you can render
front and back separately)
- "Solid", all solid faces, includes sky at the moment too
- "ZTransp", all transparent faces
- "Halo", the halos
- "Strand", the particle strands (not coded yet...)
Currently only 2 'passes' are exported for render, which is the "Combined"
buffer and the "Z. The latter now works, and can be turned on/off.
Note that all layers are still fully kept in memory now, saving the tiles
and layers to disk (in exr) is also todo.
-> New Blur options
The existing Blur Node (compositor) now has an optional input image. This
has to be a 'value buffer', which can be a Zbuffer, or any mask you can
think of. The input values have to be in the 0-1 range, so another new
node was added too "Map Value".
The value input can also be used to tweak blur size with the (todo)
Time Node.
Temporal screenies:
http://www.blender.org/bf/rt.jpghttp://www.blender.org/bf/rt1.jpghttp://www.blender.org/bf/rt2.jpg
BTW: The compositor is very slow still, it recalulates all nodes on each
change still. Persistant memory and dependency checks is coming!
A full detailed description of this will be done later... is several days
of work. Here's a summary:

Render:
- Full cleanup of render code, removing *all* globals and bad level calls
  all over blender. Render module is now not called abusive anymore
- API-fied calls to rendering
- Full recode of internal render pipeline. Is now rendering tiles by
  default, prepared for much smarter 'bucket' render later.
- Each thread now can render a full part
- Renders were tested with 4 threads, goes fine, apart from some lookup
  tables in softshadow and AO still
- Rendering is prepared to do multiple layers and passes
- No single 32 bits trick in render code anymore, all 100% floats now.

Writing images/movies
- moved writing images to blender kernel (bye bye 'schrijfplaatje'!)
- made a new Movie handle system, also in kernel. This will enable much
  easier use of movies in Blender

PreviewRender:
- Using new render API, previewrender (in buttons) now uses regular render
  code to generate images.
- new datafile 'preview.blend.c' has the preview scenes in it
- previews get rendered in exact displayed size (1 pixel = 1 pixel)

3D Preview render
- new; press Pkey in 3d window, for a panel that continuously renders
  (pkey is for games, i know... but we dont do that in orange now!)
- this render works nearly identical to buttons-preview render, so it stops
  rendering on any event (mouse, keyboard, etc)
- on moving/scaling the panel, the render code doesn't recreate all geometry
- same for shifting/panning view
- all other operations (now) regenerate the full render database still.
- this is WIP... but big fun, especially for simple scenes!

Compositor
- Using same node system as now in use for shaders, you can composit images
- works pretty straightforward... needs much more options/tools and integration
  with rendering still
- is not threaded yet, nor is so smart to only recalculate changes... will be
  done soon!
- the "Render Result" node will get all layers/passes as output sockets
- The "Output" node renders to a builtin image, which you can view in the Image
  window. (yes, output nodes to render-result, and to files, is on the list!)

The Bad News
- "Unified Render" is removed. It might come back in some stage, but this
  system should be built from scratch. I can't really understand this code...
  I expect it is not much needed, especially with advanced layer/passes
  control
- Panorama render, Field render, Motion blur, is not coded yet... (I had to
  recode every single feature in render, so...!)
- Lens Flare is also not back... needs total revision, might become composit
  effect though (using zbuffer for visibility)
- Part render is gone! (well, thats obvious, its default now).
- The render window is only restored with limited functionality... I am going
  to check first the option to render to a Image window, so Blender can become
  a true single-window application. :)
  For example, the 'Spare render buffer' (jkey) doesnt work.
- Render with border, now default creates a smaller image
- No zbuffers are written yet... on the todo!
- Scons files and MSVC will need work to get compiling again

OK... thats what I can quickly recall. Now go compiling!
Image as loaded in Blender (from openexr.com):
http://www.blender.org/bf/exrcurve1.jpg

Image with different white point:
http://www.blender.org/bf/exrcurve2.jpg

Image with white and black point and a curve:
http://www.blender.org/bf/exrcurve3.jpg

Use SHIFT+click to set the black point, and CTRL+click for white point.
The buttons in the panel work too, of course.

The curves work after the black/white range was corrected, so you can
stick to curves with a normal 0-1 range.
There's also now a general color curve, marked with 'C' button.

Note; this currently only maps the float colors to a visible 8 bits per
channel rect. You can save it, but when the blender file loads the curve
or mapping is not executed until you click in the curves... have to look
at that still.
Speed for this is also quite unoptimized... still WIP, but fun!
- New UI element: the "Curve Button".

For mapping ranges (like 0 - 1) to another range, the curve button can be
used for proportional falloff, bone influences, painting density, etc.
Most evident use is of course to map RGB color with curves.

To be able to use it, you have to allocate a CurveMapping struct and pass
this on to the button. The CurveMapping API is in the new C file
blenkernel/intern/colortools.c
It's as simple as calling:

   curvemap= curvemapping_add(3, 0, 0, 1, 1)

Which will create 3 curves, and sets a default 0-1 range. The current code
only supports up to 4 curves maximum per mapping struct.
The CurveMap button in Blender than handles allmost all  editing.
Evaluating a single channel:

   float newvalue= curvemapping_evaluateF(curvemap, 0, oldval);

Where the second argument is the channel index, here 0-1-2 are possible.
Or mapping a vector:

   curvemapping_evaluate3F(curvemap, newvec, oldvec);

Optimized versions for byte or short mapping is possible too, not done yet.

In butspace.c I've added a template wrapper for buttons around the curve, to
reveil settings or show tools; check this screenie:

http://www.blender.org/bf/curves.jpg

- Buttons R, G, B: select channel
- icons + and -: zoom in, out
- icon 'wrench': menu with tools, like clear curve, set handle type
- icon 'clipping': menu with clip values, and to dis/enable clipping
- icon 'x': delete selection

In the curve button itself, only LMB clicks are handled (like all UI elements
in Blender).

- click on point: select
- shift+click on point: swap select
- click on point + drag: select point (if not selected) and move it
- click outside point + drag: translate view
- CTRL+click: add new point
- hold SHIFT while dragging to snap to grid
  (Yes I know... either one of these can be Blender compliant, not both!)
- if you drag a point exactly on top of another, it merges them

Other fixes:

- Icons now draw using "Safe RasterPos", so they align with pixel boundary.
  the old code made ints from the raster pos coordinate, which doesn't work
  well for zoom in/out situations

- bug in Node editing: buttons could not get freed, causing in memory error
  prints at end of a Blender session. That one was a very simple, but nasty
  error causing me all evening last night to find!
  (Hint; check diff of editnode.c, where uiDoButtons is called)

Last note: this adds 3 new files in our tree, I did scons, but not MSVC!
**** NEW: Group Nodes

Node trees usually become messy and confusing quickly, so we need
not only a way to collapse Nodes into single 'groups', but also a
way to re-use that data to create libraries of effects.

This has been done by making a new Library data type, the NodeTree.
Everything that has been grouped is stored here, and available for
re-use, appending or linking. These NodeTrees are fully generic,
i.e. can store shader trees, composit trees, and so on. The 'type'
value as stored in the NodeTree will keep track of internal type
definitions and execute/drawing callbacks. Needless to say, re-using
shader trees in a composit tree is a bit useless, and will be
prevented in the browsing code. :)

So; any NodeTree can become a "Goup Node" inside in a NodeTree. This
Group Node then works just like any Node.
To prevent the current code to become too complex, I've disabled
the possibility to insert Groups inside of Groups. That might be
enabled later, but is a real nasty piece of code to get OK.

Since Group Nodes are a dynamic Node type, a lot of work has been
done to ensure Node definitions can be dynamic too, but still allow
to be stored in files, and allow to be verified for type-definition
changes on reloading. This system needs a little bit maturing still,
so the Python gurus should better wait a little bit! (Also for me to
write the definite API docs for it).

What works now:

- Press CTRL+G to create a new Group. The grouping code checks for
impossible selections (like an unselected node between selected nodes).
Everthing that's selected then gets removed from the current tree, and
inserted in a new NodeTree library data block. A Group Node then is
added which links to this new NodeTree.

- Press ALT+G to ungroup. This will not delete the NodeTree library
data, but just duplicate the Group into the current tree.

- Press TAB, or click on the NodeTree icon to edit Groups. Note that
NodeTrees are instances, so editing one Group will also change the
other users.
This also means that when removing nodes in a Group (or hiding sockets
or changing internal links) this is immediately corrected for all users
of this Group, also in other Materials.

- While editing Groups, only the internal Nodes can be edited. A single
click outside of the Group boundary will close this 'edit mode'.

What needs to be done:

- SHIFT+A menu in toolbox style, also including a list of Groups
- Enable the single-user button in the Group Node
- Displaying all (visible) internal group UI elements in the Node Panel
- Enable Library linking and prevent editing of Groups then.


**** NEW: Socket Visibility control

Node types will be generated with a lot of possible inputs or outputs,
and drawing all sockets all the time isn't very useful then.

A new option in the Node header ('plus' icon) allows to either hide all
unused sockets (first keypress) or to reveil them (when there are hidden
sockets, the icon displays black, otherwise it's blended).

Hidden sockets in Nodes also are not exported to a Group, so this way
you can control what options (in/outputs) exactly are available.

To be done:
- a way to hide individual sockets, like with a RMB click on it.

**** NEW: Nodes now render!

This is still quite primitive, more on a level to replace the (now
obsolete and disabled) Material Layers.

What needs to be done:

- make the "Geometry" node work properly, also for AA textures
- make the Texture Node work (does very little at the moment)
- give Material Nodes all inputs as needed (like Map-to Panel)
- find a way to export more data from a Material Node, like the
  shadow value, or light intensity only, etc

Very important also to separate from the Material Buttons the
"global" options, like "Ztransp" or "Wire" or "Halo". These can not
be set for each Material-Node individually.

Also note that the Preview Render (Buttons window) now renders a bit
differently. This was a horrid piece of antique code, using a totally
incompatible way of rendering. Target is to fully re-use internal
render code for previews.

OK... that's it mostly. Now test!
********* Node editor work:

- To enable Nodes for Materials, you have to set the "Use Nodes"
  button, in the new Material buttons "Nodes" Panel or in header
  of the Node editor. Doing this will disable Material-Layers.

- Nodes now execute materials ("shaders"), but still only using the
  previewrender code.

- Nodes have (optional) previews for rendered images.

- Node headers allow to hide buttons and/or preview image

- Nodes can be dragged larger/smaller (right-bottom corner)

- Nodes can be hidden (minimized) with hotkey H

- CTRL+click on an Input Socket gives a popup with default values.

- Changing Material/Texture or Mix node will adjust Node title.

- Click-drag outside of a Node changes cursor to "Knife' and allows to
  draw a rect where to cut Links.

- Added new node types RGBtoBW, Texture, In/Output, ColorRamp

- Material Nodes have options to ouput diffuse or specular, or to use
  a negative normal. The input socket 'Normal' will force the material
  to use that normal, otherwise it uses the normal from the Material
  that has the node tree.

- When drawing a link between two not-matching sockets, Blender inserts
  a converting node (now only for value/rgb combos)

- When drawing a link to an input socket that's already in use, the
  old link will either disappear or flip to another unused socket.

- A click on a Material Node will activate it, and show all its settings
  in the Material Buttons. Active Material Nodes draw the material icon
  in red.

- A click on any node will show its options in the Node Panel in the
  Material buttons.

- Multiple Output Nodes can be used, to sample contents of a tree, but
  only one Output is the real one, which is indicated in a different
  color and red material icon.

- Added ThemeColors for node types

- ALT+C will convert existing Material-Layers to Node... this currently
  only adds the material/mix nodes and connects them. Dunno if this is
  worth a lot of coding work to make perfect?

- Press C to call another "Solve order", which will show all possible
  cyclic conflicts (if there are).

- Technical: nodes now use "Type" structs which define the
  structure of nodes and in/output sockets. The Type structs store all
  fixed info, callbacks, and allow to reconstruct saved Nodes to match
  what is required by Blender.

- Defining (new) nodes now is as simple as filling in a fixed
  Type struct, plus code some callbacks. A doc will be made!

- Node preview images are by default float

********* Icon drawing:

- Cleanup of how old icons were implemented in new system, making
  them 16x16 too, correctly centered *and* scaled.

- Made drawing Icons use float coordinates

- Moved BIF_calcpreview_image() into interface_icons.c, renamed it
  icon_from_image(). Removed a lot of unneeded Imbuf magic here! :)

- Skipped scaling and imbuf copying when icons are OK size


********* Preview render:

- Huge cleanup of code....

- renaming BIF_xxx calls that only were used internally

- BIF_previewrender() now accepts an argument for rendering method,
  so it supports icons, buttonwindow previewrender and node editor

- Only a single BIF_preview_changed() call now exists, supporting all
  signals as needed for buttos and node editor


********* More stuff:

- glutil.c, glaDrawPixelsSafe() and glaDrawPixelsTex() now accept format
  argument for GL_FLOAT rects

- Made the ColorBand become a built-in button for interface.c
  Was a load of cleanup work in buttons_shading.c...

- removed a load of unneeded glBlendFunc() calls

- Fixed bug in calculating text length for buttons (ancient!)