The first incarnation assumed that proxies were local objects per
definition. Unfortunately that makes it impossible to - for example -
reference-link an entire Scene with proxies, to be used as a special
character set.

This commit makes the proxy implementation also a bit more clear.

Related work: the scene-sets were not executed fully or correctly for
the dependency graph. That happens now (in 3d view) as well.
THE OBJECT PROXY

Or simple said; local control of referenced data from libraries.
Having library files with references is a very common studio setup, and
Blender did do quite well in that area. Were it not that for character
setups it was impossible to use still.

This commit will enable a full rig+character to remain in the library,
and still have - under strict control - local access for animation edits.

Full log:
http://www.blender3d.org/cms/Proxy_Objects.824.0.html
The "Copy Size" constraint was calling a where_is_object(), this caused
the depsgraph to mess up in very weird ways and rare occasions. In the
sample file it showed strange lags in bones for using the "Stride bone"
option.

While trying to locate the bug I've revisited the Pose depsgraph in detail,
trying to figure out how it can print possible cycle errors in dependency.
That has been added now too (in console). Unfortunately the bugreport
example had no cycle errors. :)
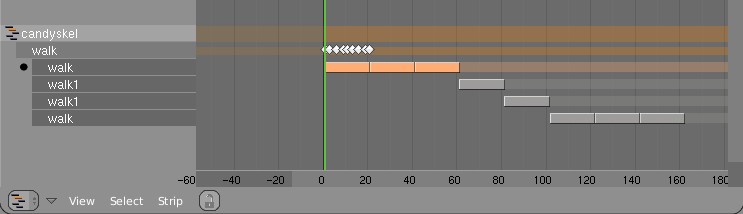
- FORWARD CYCLING & MATCHING

Up to no now, adding multiple actions in NLA with walkcycles required to
animate them standing still, as if walking on a conveyor belt. The stride
option then makes the object itself move forward, trying to keep the foot
stuck on the floor (with poor results!).
This option now allows to make walk cycles moving forward. By
indicating a reference Offset Bone, the NLA system will use that bone to
detect the correct offset for the Armature Pose to make it seamlessly going
forward.

Best of all, this option works as for cyclic Action Strips as well as for
individual Action Strips. Note that for individual strips, you have to set
the strip on "Hold". (Might become automatic detected later).

Here's an example edit image for NLA:
http://www.blender.org/bf/nla_match-cycle.jpg
And the animation for it:
http://download.blender.org/demo/test/2.43/0001_0150_match.avi
Blender file:
http://download.blender.org/demo/test/2.43/mancandy_matching.blend

Using this kind of cycling works pretty straightforward, and is a lot
easier to setup than Stride Bones.

To be further tested:
- Blending cycles
- matching rotation for the bones as well.

- ACTION MODIFIERS (motion deformors)

The above option was actually required for this feature. Typically walk
cycles are constructed with certain Bones to be the handles, controlling
for example the torso or feet.
An Action Modifier allows you to use a Curve Path to deform the motion of
these controlling bones. This uses the existing Curve Deformation option.
Modifiers can be added per Action Strip, each controlling a channel (bone)
by choice, and even allows to layer multiple modifiers on top of each other
(several paths deforming motion). This option is using the dependency graph,
so editing the Curve will give realtime changes in the Armature.

The previous walkcycle, controlled by two curves:
http://download.blender.org/demo/test/2.43/0001_0150_deform.avi
Blender file:
http://download.blender.org/demo/test/2.43/mancandy_actiondeform.blend

Action Modifiers can be added in the NLA Properties Panel. Per Modifier you
have to indicate the channel and a Curve Object. You can copy modifiers from
one strip to another using CTRL+C (only copies to active Object strips).

Setting up a correct Curve Path has to be carefully done:
- Use SHIFT+A "Curve Path" in top view, or ensure the path is not rotated.
- make sure the center point of the Curve Object is at the center of the
  Armature (or above)
- move the first point of the curve to the center point as well.
- check if the path starts from this first point, you can change it using
  (in Curve EditMode) the option Wkey -> "Switch Direction"
- Make sure alignment uses the correct axis; if the Armature walks into
  the negative Y direction, you have to set in Object Buttons, "Anim settings"
  Panel, the correct Track option. (Note; option will probably move to the
  Modifier later).

This is a good reason to make such paths automatic (on a command). Is on the
todo list.

Also note this:
- the Curve Path extends in beginning and ending, that's (for now) the default,
  and allows to use multiple paths. Make sure paths begin and end horizontal.
- Moving the Curve in Object Mode will change the "mapping" (as if the landscape
  a character walks over moves). Moving the Curve in Edit Mode will change the
  actual position of the deformation.
- Speed (Ipos) on paths is not supported yet, will be done.
- The Curve "Stretch" deform option doesn't work.
- Modifiers are executed *after* all actions in NLA are evaluated, there's no
  support yet for blending multiple strips with Modifiers.
- This doesn't work yet for time-mapping...

This commit is mostly for review by character animators... some details or
working methods might change.
This feature can also be used for other modifiers, such as noise (Perlin) or
the mythical "Oomph" (frequency control) and of course Python.

Special thanks to Bassam & Matt for research & design help. Have fun!
- readfile.c, version patch for new toolsettings used a malloc, using
  unitialized variables
- despgraph, another malloc changed to calloc
- timer code for render ESC: unitialized variable in struct
Depsgraph fix: the signal DAG_object_flush_update() should flush changes in
'data' to all object users of that data, not only in current scene.

Error was that switching scenes sometimes showed invalid derivedmesh data,
with bezerk drawing.
Found reasonable OK solution for a cyclic dependency that was bothering
a lot of (character) animators. They would like to drive bones with
Objects, but that lagged when you parent these Objects to the
armature, since that's a circular dependency.

Since Driver relations are only looking at local object properties (i.e.
it's local position/rotation) there's a simple way to solve it. In case
such Objects have an Ipo, it reads driver values directly from the
Object Ipo (on correct time) instead of Object values.
Each report was about a different failure with Particles, all related to
weak handling of animation systems and the depsgraph.

Fix has 2 parts; depsgraph now signals "object recalc" to be for time
changes; this then is used to bypass particle-building (since that's baked).

Other part is better object caching while makig particles.
Groups are supposed to play its entire (internal) animation system
properly, also when using a dupli-group, linking the group from other file.

When dependencies in a scene change, the groups didn't get corrected,
causing dupli-group to not playback without lag.
This commit resorts the group objects on each DAG_scene_sort() call.
wiki with info: http://mediawiki.blender.org/index.php/BlenderDev/PyDrivers

(there are two sample .blends in the patch tracker entry, last link in
the wiki page)

Notes:

In usiblender.c I just made Python exit before the main library gets
freed. I found a situation with pydrivers where py's gc tried to del
objects on exit and their ID's were not valid anymore (so sigsegv).

Ton needs to check the depsgraph part.

For now pydrivers can reference their own object, something normal
ipodrivers can't. This seems to work fine and is quite useful, but if
tests prove the restriction is necessary, we just need to uncomment a
piece of code in EXPP_interface.c, marked with "XXX".

Thanks Ton for the ipodrivers code and adding the hooks for the py part
and Martin for the "Button Python Evaluation" patch from which I started
this one.

Anyone interested, please check the wiki, the .blends (they have
README's) and tell me about any issue.
Camera was excluded from depsgraph when not visible in current layer...
resulting in camera animations to not move.

Solved with just an exception, but it certainly is attention point for the
depsgraph cleanup.
with each having different scenes, changing screens didn't call the proper
set_scene() call, which left quite some stuff improperly initialized.

With depsgraph code even causes crashing.
issues in parallel... So this commit contains: an update of
the solver (e.g. moving objects), integration of blender IPOs,
improved rendering (motion blur, smoothed normals) and a first particle
test. In more detail:
Solver update:
- Moving objects using a relatively simple model, and not yet fully optimized - ok
for box falling into water, water in a moving glass might cause trouble. Simulation
times are influenced by overall no. of triangles of the mesh, scaling meshes up a lot
might also cause slowdowns.
- Additional obstacle settings: noslip (as before), free slip (move along wall freely)
and part slip (mix of both).
- Obstacle settings also added for domain boundaries now, the six walls of the domain are
obstacles after all as well
- Got rid of templates, should make compiling for e.g. macs more convenient,
for linux there's not much difference. Finally got rid of parser (and some other code
parts), the simulation now uses the internal API to transfer data.
- Some unnecessary file were removed, the GUI now needs 3 settings buttons...
This should still be changed (maybe by adding a new panel for domain objects).
IPOs:
- Animated params: viscosity, time and gravity for domains. In contrast
to normal time IPO for Blender objects, the fluidsim one scales the time
step size - so a constant 1 has no effect, values towards 0 slow it down,
larger ones speed the simulation up (-> longer time steps, more compuations).
The viscosity IPO is also only a factor for the selected viscosity (again, 1=no effect).
- For objects that are enabled for fluidsim, a new IPO type shows up. Inflow
objects can use the velocity channels to animate the inflow. Obstacles, in/outflow
objects can be switched on (Active IPO>0) and off (<0) during the simulation.
- Movement, rotation and scaling of those 3 types is exported from the normal
Blender channels (Loc,dLoc,etc.).
Particles:
- This is still experimental, so it might be deactivated for a
release... It should at some point be used to model smaller splashes,
depending on the the realworld size and the particle generation
settings particles are generated during simulation (stored in _particles_X.gz
files).
- These are loaded by enabling the particle field for an arbitrary object,
which should be given a halo material. For each frame, similar to the mesh
loading, the particle system them loads the simulated particle positions.
- For rendering, I "abused" the part->rt field - I couldnt find any use
for it in the code and it seems to work fine. The fluidsim particles
store their size there.
Rendering:
- The fluidims particles use scaled sizes and alpha values to give a more varied
appearance. In convertblender.c fluidsim particle systems use the p->rt field
to scale up the size and down the alpha of "smaller particles". Setting the
influence fields in the fluidims settings to 0 gives equally sized particles
with same alpha everywhere. Higher values cause larger differences.
- Smoothed normals: for unmodified fluid meshes (e.g. no subdivision) the normals
computed by the solver are used. This is basically done by switching off the
normal recalculation in convertblender.c (the function calc_fluidsimnormals
handles other mesh inits instead of calc_vertexnormals).
This could also be used to e.g. modify mesh normals in a modifier...
- Another change is that fluidsim meshes load the velocities computed
during the simulation for image based motion blur. This is inited in
load_fluidsimspeedvectors for the vector pass (they're loaded during the
normal load in DerivedMesh readBobjgz). Generation and loading can be switched
off in the settings. Vector pass currently loads the fluidism meshes 3 times,
so this should still be optimized.
Examples:
- smoothed normals versus normals from subdividing once:
http://www10.informatik.uni-erlangen.de/~sinithue/temp/v060227_1smoothnorms.pnghttp://www10.informatik.uni-erlangen.de/~sinithue/temp/v060227_2subdivnorms.png
- fluidsim particles, size/alpha influence 0:
http://www10.informatik.uni-erlangen.de/~sinithue/temp/v060227_3particlesnorm.png
size influence 1:
http://www10.informatik.uni-erlangen.de/~sinithue/temp/v060227_4particlessize.png
size & alpha influence 1:
http://www10.informatik.uni-erlangen.de/~sinithue/temp/v060227_5particlesalpha.png
- the standard drop with motion blur and particles:
http://www10.informatik.uni-erlangen.de/~sinithue/temp/elbeemupdate_t2new.mpg
(here's how it looks without
http://www10.informatik.uni-erlangen.de/~sinithue/temp/elbeemupdate_t1old.mpg)
- another inflow animation (moving, switched on/off) with a moving obstacle
(and strong mblur :)
http://www10.informatik.uni-erlangen.de/~sinithue/temp/elbeemupdate_t3ipos.mpg
Things still to fix:
- rotating & scaling domains causes wrong speed vectors
- get rid of SDL code for threading, use pthreads as well?
- update wiki documentation
- cool effects for rendering would be photon maps for caustics,
and motion blur for particles :)
- Scene support in RenderLayers
You now can indicate in Compositor to use RenderLayer(s) from other scenes.
Use the new dropdown menu in the "Render Result" node. It will change the
title of the node to indicate that.

The other Scenes are rendered fully separate, creating own databases (and
octrees) after the current scene was finished. They use their own render
settings, with as exception the render output size (and optional border).
This makes the option an interesting memory saver and speedup.

Also note that the render-results of other scenes are kept in memory while
you work. So, after a render, you can tweak all composit effects.

- Render Stats
Added an 'info string' to stats, printed in renderwindow header. It gives
info now on steps "creating database", "shadow buffers", and "octree".

- Bug fixes

Added redraw event for Image window, when using compositor render.

Text objects were not rendered using background render (probably a bug
since depsgraph was added)

Dropdown buttons in Node editor were not refreshed after usage

Sometimes render window did not open, this due to wrong check for 'esc'.

Removed option that renders view-layers on F12, with mouse in 3d window.
Not only was it confusing, it's now more efficient with the Preview Panel,
which does this nicely.
A full detailed description of this will be done later... is several days
of work. Here's a summary:

Render:
- Full cleanup of render code, removing *all* globals and bad level calls
  all over blender. Render module is now not called abusive anymore
- API-fied calls to rendering
- Full recode of internal render pipeline. Is now rendering tiles by
  default, prepared for much smarter 'bucket' render later.
- Each thread now can render a full part
- Renders were tested with 4 threads, goes fine, apart from some lookup
  tables in softshadow and AO still
- Rendering is prepared to do multiple layers and passes
- No single 32 bits trick in render code anymore, all 100% floats now.

Writing images/movies
- moved writing images to blender kernel (bye bye 'schrijfplaatje'!)
- made a new Movie handle system, also in kernel. This will enable much
  easier use of movies in Blender

PreviewRender:
- Using new render API, previewrender (in buttons) now uses regular render
  code to generate images.
- new datafile 'preview.blend.c' has the preview scenes in it
- previews get rendered in exact displayed size (1 pixel = 1 pixel)

3D Preview render
- new; press Pkey in 3d window, for a panel that continuously renders
  (pkey is for games, i know... but we dont do that in orange now!)
- this render works nearly identical to buttons-preview render, so it stops
  rendering on any event (mouse, keyboard, etc)
- on moving/scaling the panel, the render code doesn't recreate all geometry
- same for shifting/panning view
- all other operations (now) regenerate the full render database still.
- this is WIP... but big fun, especially for simple scenes!

Compositor
- Using same node system as now in use for shaders, you can composit images
- works pretty straightforward... needs much more options/tools and integration
  with rendering still
- is not threaded yet, nor is so smart to only recalculate changes... will be
  done soon!
- the "Render Result" node will get all layers/passes as output sockets
- The "Output" node renders to a builtin image, which you can view in the Image
  window. (yes, output nodes to render-result, and to files, is on the list!)

The Bad News
- "Unified Render" is removed. It might come back in some stage, but this
  system should be built from scratch. I can't really understand this code...
  I expect it is not much needed, especially with advanced layer/passes
  control
- Panorama render, Field render, Motion blur, is not coded yet... (I had to
  recode every single feature in render, so...!)
- Lens Flare is also not back... needs total revision, might become composit
  effect though (using zbuffer for visibility)
- Part render is gone! (well, thats obvious, its default now).
- The render window is only restored with limited functionality... I am going
  to check first the option to render to a Image window, so Blender can become
  a true single-window application. :)
  For example, the 'Spare render buffer' (jkey) doesnt work.
- Render with border, now default creates a smaller image
- No zbuffers are written yet... on the todo!
- Scons files and MSVC will need work to get compiling again

OK... thats what I can quickly recall. Now go compiling!
particle generator can be duplicated.

Note that the particles are only generated once, on the original, and just
get duplicated.
For static particles it worked already OK.

Added note for previous grouping commit; group-duplicators should support
fully all animation systems, including modifiers and particles.
-> Any Group Duplicate now can get local timing and local NLA override. This
   enables to control the entire animation system of the Group.

Two methods for this have been implemented.
1) The quick way: just give the duplicator a "Startframe" offset.
2) Advanced: in the NLA Editor you can add ActionStrips to the duplicator
   to override NLA/action of any Grouped Object.

For "Group NLA" to work, an ActionStrip needs to know which Object in a
group it controls. On adding a strip, the code checks if an Action was
already used by an Object in the Group, and assigns it automatic to that
Object.
You can also set this in the Nkey "Properties" panel for the strip.

Change in NLA: the SHIFT+A "Add strip" command now always adds strips to
the active Object. (It used to check where mouse was). This allows to add
NLA strips to Objects that didn't have actions/nla yet.

Important note: In Blender, duplicates are fully procedural and generated
on the fly for each redraw. This means that redraw speed equals to stepping
through frames, when using animated Duplicated Groups.

-> Recoded entire duplicator system

The old method was antique and clumsy, using globals and full temporal
copies of Object. The new system is nicer in control, faster, and since it
doesn't use temporal object copies anymore, it works better with Derived
Mesh and DisplayList and rendering.

By centralizing the code for duplicating, more options can be easier added.
Features to note:

- Duplicates now draw selected/unselected based on its Duplicator setting.
- Same goes for the drawtype (wire, solid, selection outline, etc)
- Duplicated Groups can be normally selected too

Bonus goodie: SHIFT+A (Toolbox) now has entry "Add group" too, with a
listing of all groups, allowing to add Group instances immediate.

-> Library System

- SHIFT+F4 data browse now shows the entire path for linked data
- Outliner draws Library Icons to denote linked data
- Outliner operation added: "Make Local" for library data.
- Outliner now also draws Groups in regular view, allowing to unlink too.

-> Fixes

- depsgraph missed signal update for bone-parented Objects
- on reading file, the entire database was tagged to "recalc" fully,
  causing unnecessary slowdown on reading.

Might have missed stuff... :)
Series of fixes in Library linking of groups;

- On library-linking (SHIFT-F1) a Group, the Objects now don't get a "Base"
  anymore, meaning they won't show up as Objects in the Scene.
  This ensures you can use the linked Group as duplicator without having
  your file polluted with new (and linked) objects.
  (I realize it should be possible to have it with Base too, will check)
- On append or file-read, the linked Group Objects get drawn properly,
  but the animation system doesn't run yet.
- Group buttons (F7) now shows if a Group is from Library
- Outliner draws Library linked data with blue-ish text

Other fixes;

- Using group-duplicator, with originals in hidden layer, now shows and
  updates animated Objects correctly.
- All of Object button panels did not have a proper protection against
  editing Library data.
in other layers (or hidden with local view).

In my search for the absolute minimum of recalculations, changes are only
flushed when they're visible. On changing layers, the tags then are just
set again (for everything that potentially moves) to ensure proper state.

However, it didn't work proper for linked Mesh objects that changed in
editmode, the Derivedmesh callback then accessed memory out of bounds.

The current dependency code was more designed for animation systems...
updating display data should work too, but might need some more tests!

(Thanks Andrea for clear error sample!)
Too strict checking in depsgraph code missed a dependency case; this
specifically when objects have own motion (ipo) and are being deformed
by a parent.
This worked, unless the parent also had own motion (ipo or constraint)...

Also: the DAG_add_relation() added multiple relationships for object pairs,
now they "Or" the relationship description flag. Makes it a tad faster
again :)
- Copy Location Constraint didn't update Object when it was copying from a
  Bone
- Deleting bone in editmode, and connecting bones crashed due to evaluation
  of deformation code (only allowed for pose).
http://www.blender3d.org/cms/New_Particle_options_a.721.0.html

There's no doubt this patch had a lot of good ideas for features, and I
want to compliment Janne again for getting it all to work even!
A more careful review of the features and code did show however quite some
flaws and bugs... partially because the current particle code was very much
polluted already, but also because of the implementation lacked quality.
However, the patch was too good to reject, so I've fixed and recoded the
parts that needed it most. :)

Here's a list of of most evident changes in the patch;

- Guides support recoded. It was implemented as a true 'force field',
  checking all Curve path points for each particle to find the closest. Was
  just far too slow, and didn't support looping or bends well.
  The new implementation is fast (real time) and treats the paths as actual
  trajectory for the particle.
- Guides didn't integrate in the physics/speed system either, was added as
  exception. Now it's integrated and can be combined with other velocities
  or forces
- Use of Fields was slow code in general, made it use a Cache instead.
- The "even" distribution didn't work for Jittered sample patterns.
- The "even" or "vertexgroup" code in the main loops were badly constructed,
  giving too much cpu for a simple task. Instead of going over all faces
  many times, it now only does it once.
  Same part of the code used a lot of temporal unneeded mallocs.
- Use of DerivedMesh or Mesh was confused, didn't work for Subsurfs in all
  cases
- Support for vertex groups was slow, evaluating vertexgroups too often
- When a vertexgroup failed to read, it was wrongly handled (set to zero).
  VertexGroup support now is with a name.
- Split up the too huge build_particle() call in some parts (moving new code)
- The "texture re-timing" option failed for moving Objects. The old code used
  the convention that particles were added with increasing time steps.
  Solved by creating a object Matrix Cache.
  Also: the texture coordinates had to be corrected to become "OrCo".
- The "Disp" option only was used to draw less particles. Changed it to
  actually calculate fewer particles for 3D viewing, but render all still.
  So now it can be used to keep editing realtime.

Removed;

The "speed threshold" and "Tight" features were not copied over. This
resembled too much to feature overkill. Needs re-evaluation.
Also the "Deform" option was not added, I prefer to first check if the
current particle system really works for the Modifier system.

And:

- Added integration for particle force fields in the dependency graph
- Added TAB completion for vertexgroup names!
- Made the 'wait cursor' only appear when particles take more than 0.5 sec
- The particle jitter table order now is randomized too, giving much
  nicer emitting of particles in large faces.
- Vortex field didn't correctly use speed/forces, so it didn't work for
  collisions.
- Triangle distribution was wrong
- Removed ancient bug that applied in a *very* weird way speed and forces.
  (location changes got the half force, speed the full...???)

So much... might have forgotten some notes! :)
He noted that static particles don't work with force fields yet, and
added a fix for it. This however didn't work for the depgraph yet, and
didn't correct the static particle's local space to world coordinates for
the fields. Nevertheless, while reviewing this small patch I thought it
would be fun to add now.

So: static particles now update realtime on forcefield relations. Warning
for potential slowdowns! Also note that work on the real particle patch
still has to be done... something I really will do, but in time. To get
particles correctly integrated in the animation system, quite some new
development has to be done still.
It works like for moving Object Ipos to the Action, press the Action icon
in the header of the IpoWindow, to the left of the mode selection menu.
It then creates an Action (if not existed) and moves the Shape Ipo to the
Action, using custom channel "Shape".

Main code change was that evaluating Ipo Curves for Relative Shapes had to
be recoded, but that's pretty minor and even much cleaner. (added "curval"
in the KeyBlock struct).
That this feature can work is thanks to the full modifier/derivedmesh
recode Daniel did, can't give him enough credits! :)

Also; small fixes in Outliner, for clicking on the Ipo icon (sets the Ipo
window to show that Ipo).
DAG_object_flush_update() always used scene layers, causing updates to go
wrong with 3d windows with "Lock" off (allowing local layer and camera).

This fixes a larger amount of potential issues.

Also: fixed menu title for adding IK constraint to Bone (CTRL+I).
In PoseMode, press Wkey or use the Pose pulldown menu. It calculates the
positions of all selected Bone end points, over the time as indicated with
the Scene start/end frame. This then is drawn as a path, with little black
dots on every frame, and a white dot on every 10 frames.

Paths are not saved in files, and not calculated automatic yet on changes.

To make this relative fast, but also reliable, I had to add a new method
in the Dependency graph system, to find exactly (and only) these parents
of an Object that influence its position. This is needed because the path
should show the actual global coordinates of the entire animation system.
When using 3d window "unlocked" (own layer and own camera possible), the
dependency updates didn't work, these were only using Scene layers.

Changed the dependency graph call DAG_scene_flush_update()
to accept an argument for all visible layers in a Screen.
First note that this is new functionality, unfinished, and only for
testing and feedback purposes. I'll list below what works, and what will
need work still.

This text is also in cms: http://www.blender.org/cms/Ipo_Drivers.680.0.html

An IpoDriver is like an IpoCurve, but instead of a Bezier curve, it allows
to connect a property of other Objects as input for the "channel". For
example, IpoDrivers can be used to have a Shape Key being "driven" by
the rotation of a Bone. Or the RGB colors of a Material get driven by the
XYZ location of an Object.

Editing of Drivers happens in the IpoWindow. Here you can notice that the
channels (right hand window) now have an "active" channel indicator.
To add a Driver, you have to use the "Transform Properties" Panel (Nkey).
Here you can add or remove a Driver to the active channel, and use the
buttons to fill in what kind of relationship you want to establish.

Driver Objects

Note that any Ipo Channel can become driven now, but that only Object
transformation or Pose Bone transformation can be used to become a
Driver now.
At this moment, only the local transformation is taken into account.
For Objects that means the location/rotation/scale value without Parent
transform (as shown in "Transform Properties" Panel for Objects).
For Pose Bones it means that only the Pose transform (changes of rest
position) is Driver information (also as shown in Transform Property
Panel in Pose Mode).

Mapping of Drivers

When an Ipo Channel is "driven", the mapping is by default one-to-one.
It is only restricted by already built-in limits for Channels, like
for Material the "R" value can only range from 0.0 to 1.0.

Also note that when mapping rotations, the actual rotation values
in Ipos are scaled down with a factor 10.0. (180 degrees actually has
in the Ipo system a value of 18.0). This is an ancient year zero
convention in Blender... it is a bit hidden, because the ruler
(vertical as well as horizontal) displays the virtual values correctly.
Only the Properties panel shows the actual value.

When you draw an IpoCurve in a Driven channel, this curve will define
the mapping between the Driver output (horizontal) and Driven input
(vertical, as usual).
A nice new option to use is "Insert one-to-one curve" (press I-key,
or in pulldown menu). This will also zoom the display in exactly to
fill the window, allowing easy edit. If you use this option with
degrees, it will map 180 degree rotation to a range of 1.0 unit.

Live updates

Since the Drivers are integrated in the Ipo system, they will always
be updated whenever an Ipo is evaluated. This happens at least on
frame changes.
For interactive feedback, updates while transforming objects were
added in these cases:

- Driven Object Ipos, by other Objects or Pose Bones
- Driven Shape Key Ipos, by other Objects or Pose Bones

You can also insert Drivers on Action Ipos, but these are only evaluated
on frame change now.

Todo

- Drivers can also get a text button, allowing a 1 line Python script
  to be executed.
- Make UI for it a bit less hidden... maybe with visualization in 3D?
- Allowing global transform coordinates as Driver too.

Issues

- renaming Bones won't rename drivers
- (file) appending the Ipo won't append the linked driver Objects
User doc: http://www.blender3d.org/cms/Shape_Keys.678.0.html

- The mixed use of "Vertex Key","Key" or "RVK" in Blender was a bit
confusing. Also a 'vertex key' assumes keys per vertex, which actually is
only a single key for the entire shape. The discussions on blender.org
forums all mentioned "Shape" or "Blend Shapes", which I think is an OK
name for a "Vertex Key" in the UI. :)

- Most work was code spaghetti cleanup. Doing shape-keys now nicely goes
via the depgraph and DerivedMesh. That then allows to have different
shapes per object, with the new "Pin" feature.
Objects now define what Shape is shown (ob->shapenr)

- Added a Shape Panel in the Edit buttons with the various options

- Fixed a lot of issues in the IpoWindow, with drawing the channels.
For example, deleting a key-line there caused the entire Relative option to
go wrong, same for moving the lines up/down.
Changing key-line order now reflects in order of channels. The active
Shape is drawn more clear now too.

- Noticed it doesnt work yet for curves/lattice. Need modifier advise!