| bcon_app | ||
| bcon_app_doc | ||
| data_reference | ||
| .gitignore | ||
| LICENSE | ||
| README.md | ||
| TECHNICAL_DESIGN.md | ||
Blender Conference Video Processing
NOTE: This assumes that raw video files of the talks are available on a NAS, mounted somewhere in the video processing machine.
NOTE: This tool is now a graphical 'Blender App'. The previous tooling, used up to BCon22 included, can be found in the bcon-2022 tag of this repository.
Usage During Conference
TL;DR:
Here is the summary of a talk processing. See below for more details.
- In the list of
Currenttalks, look for a talk that is finished, and select it. - Click
Start Acquire Files-> select raw recorded video in the file browser ->Acquire->Next- Use VSE to scroll to and
SetInandOuttimestamps on the raw video strip. Use also sound - Validate generated TitleCard at the start.
- Use VSE to scroll and
Setthe thumbnail for the talk ->Next - Once exporting is done,
Validateit, ensure in external video player that image and sound are fine, start and end are correct. Close the external video player ->OKto validate, click-away otherwise ->Next - Once uploading is done,
Validateit (opens a webbrowser), wait for Youtube to be fully done with encoding, check that video and description is OK, publish it. Go back to Blender ->OKto validate, click-away otherwise ->Next
General UI & Info
Be sure to have a paper print of the schedule of the day.
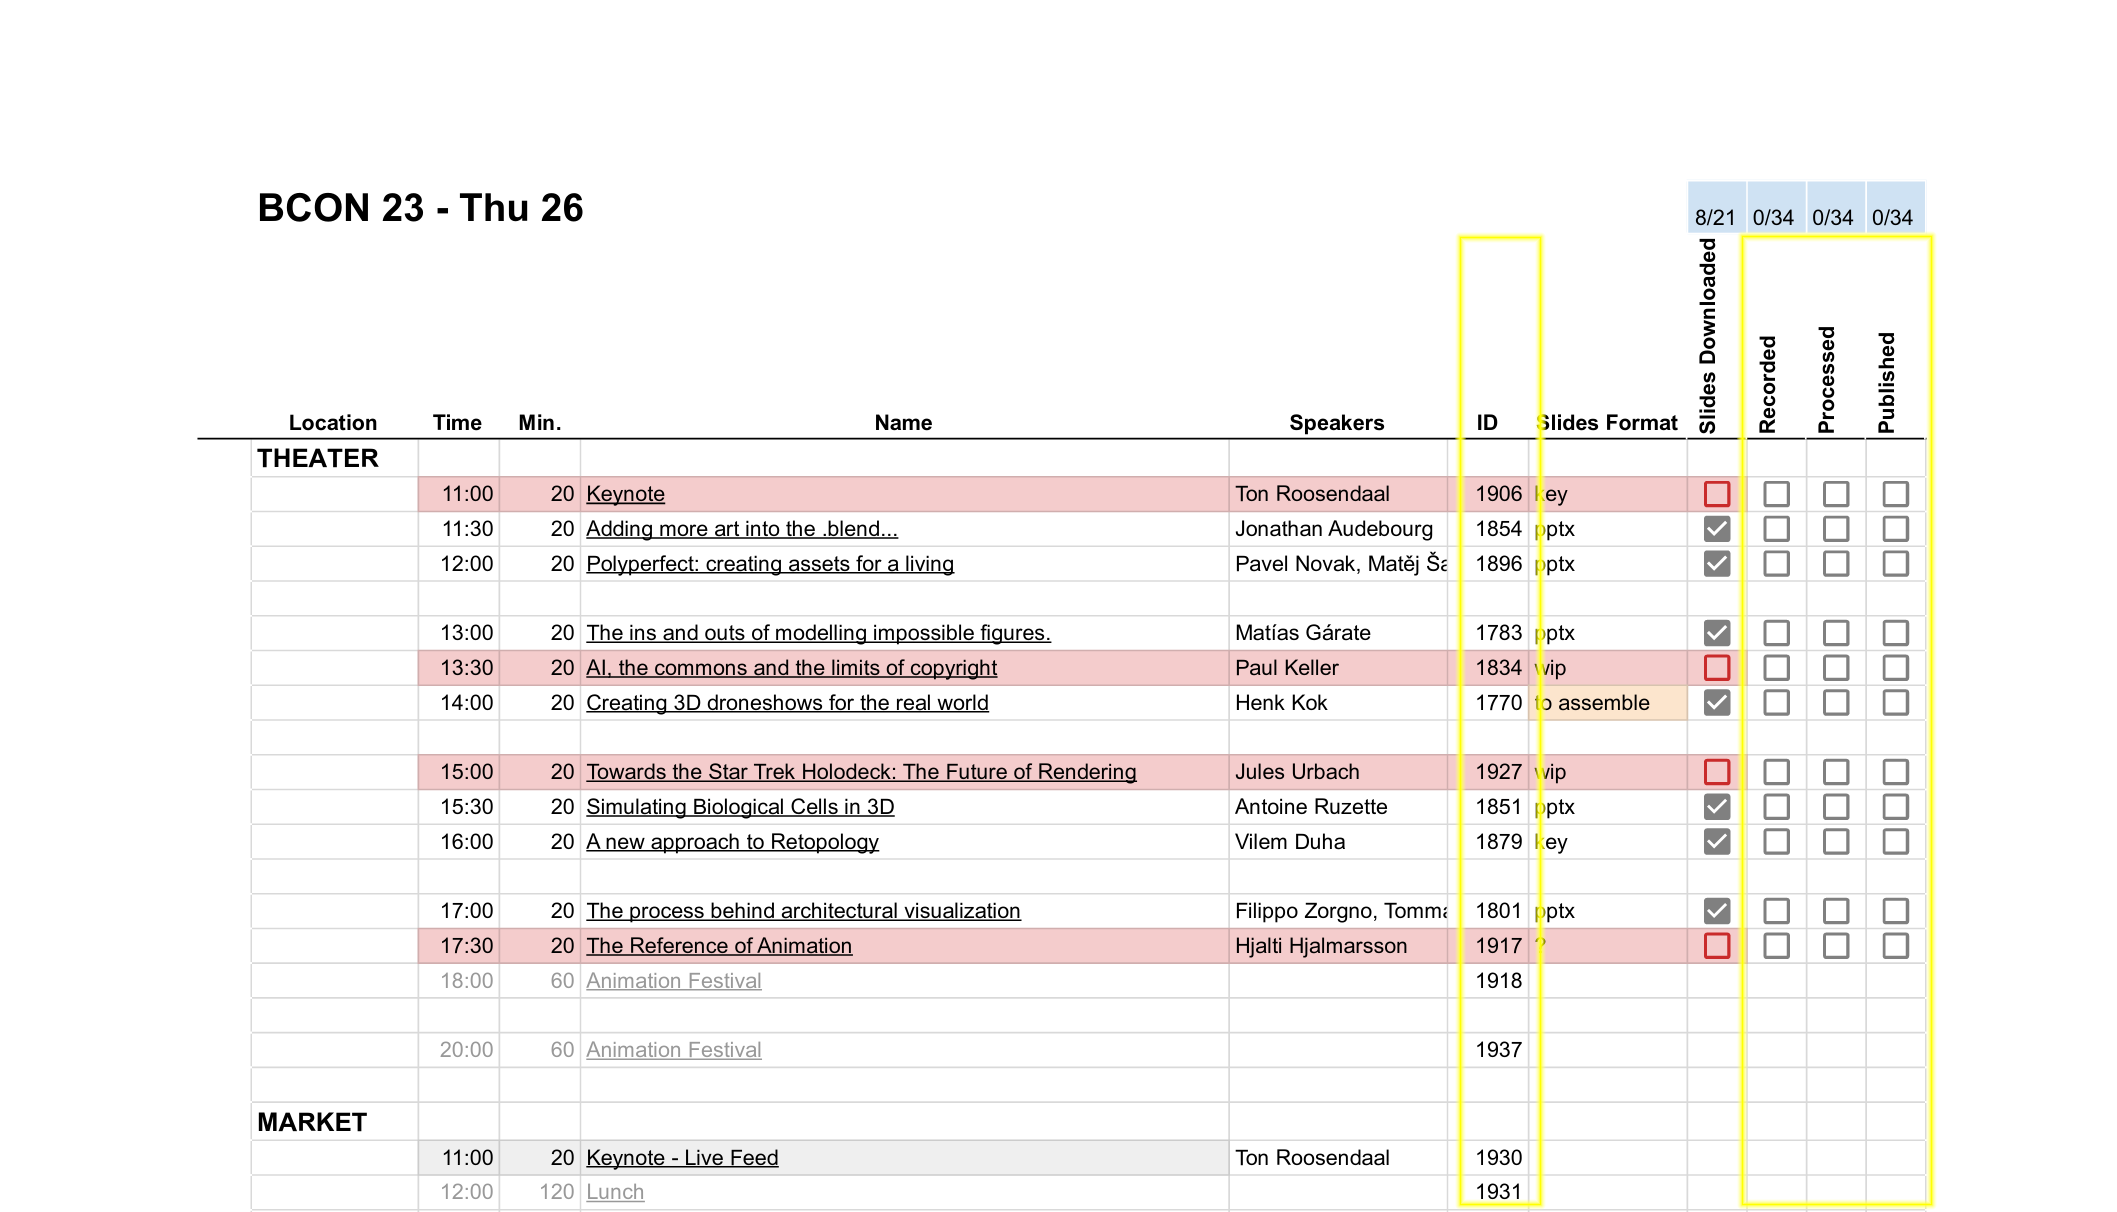
This will be used to manually mark once a talk has been:
- Recorded: the raw video file of the talk is available on the NAS.
- Processed: the talk has been processed, exported and uploaded using the BCon App.
- Published: the talk has been published on youtube.
Launch Blender BCon23 App from the main Applications -> Graphics menu.
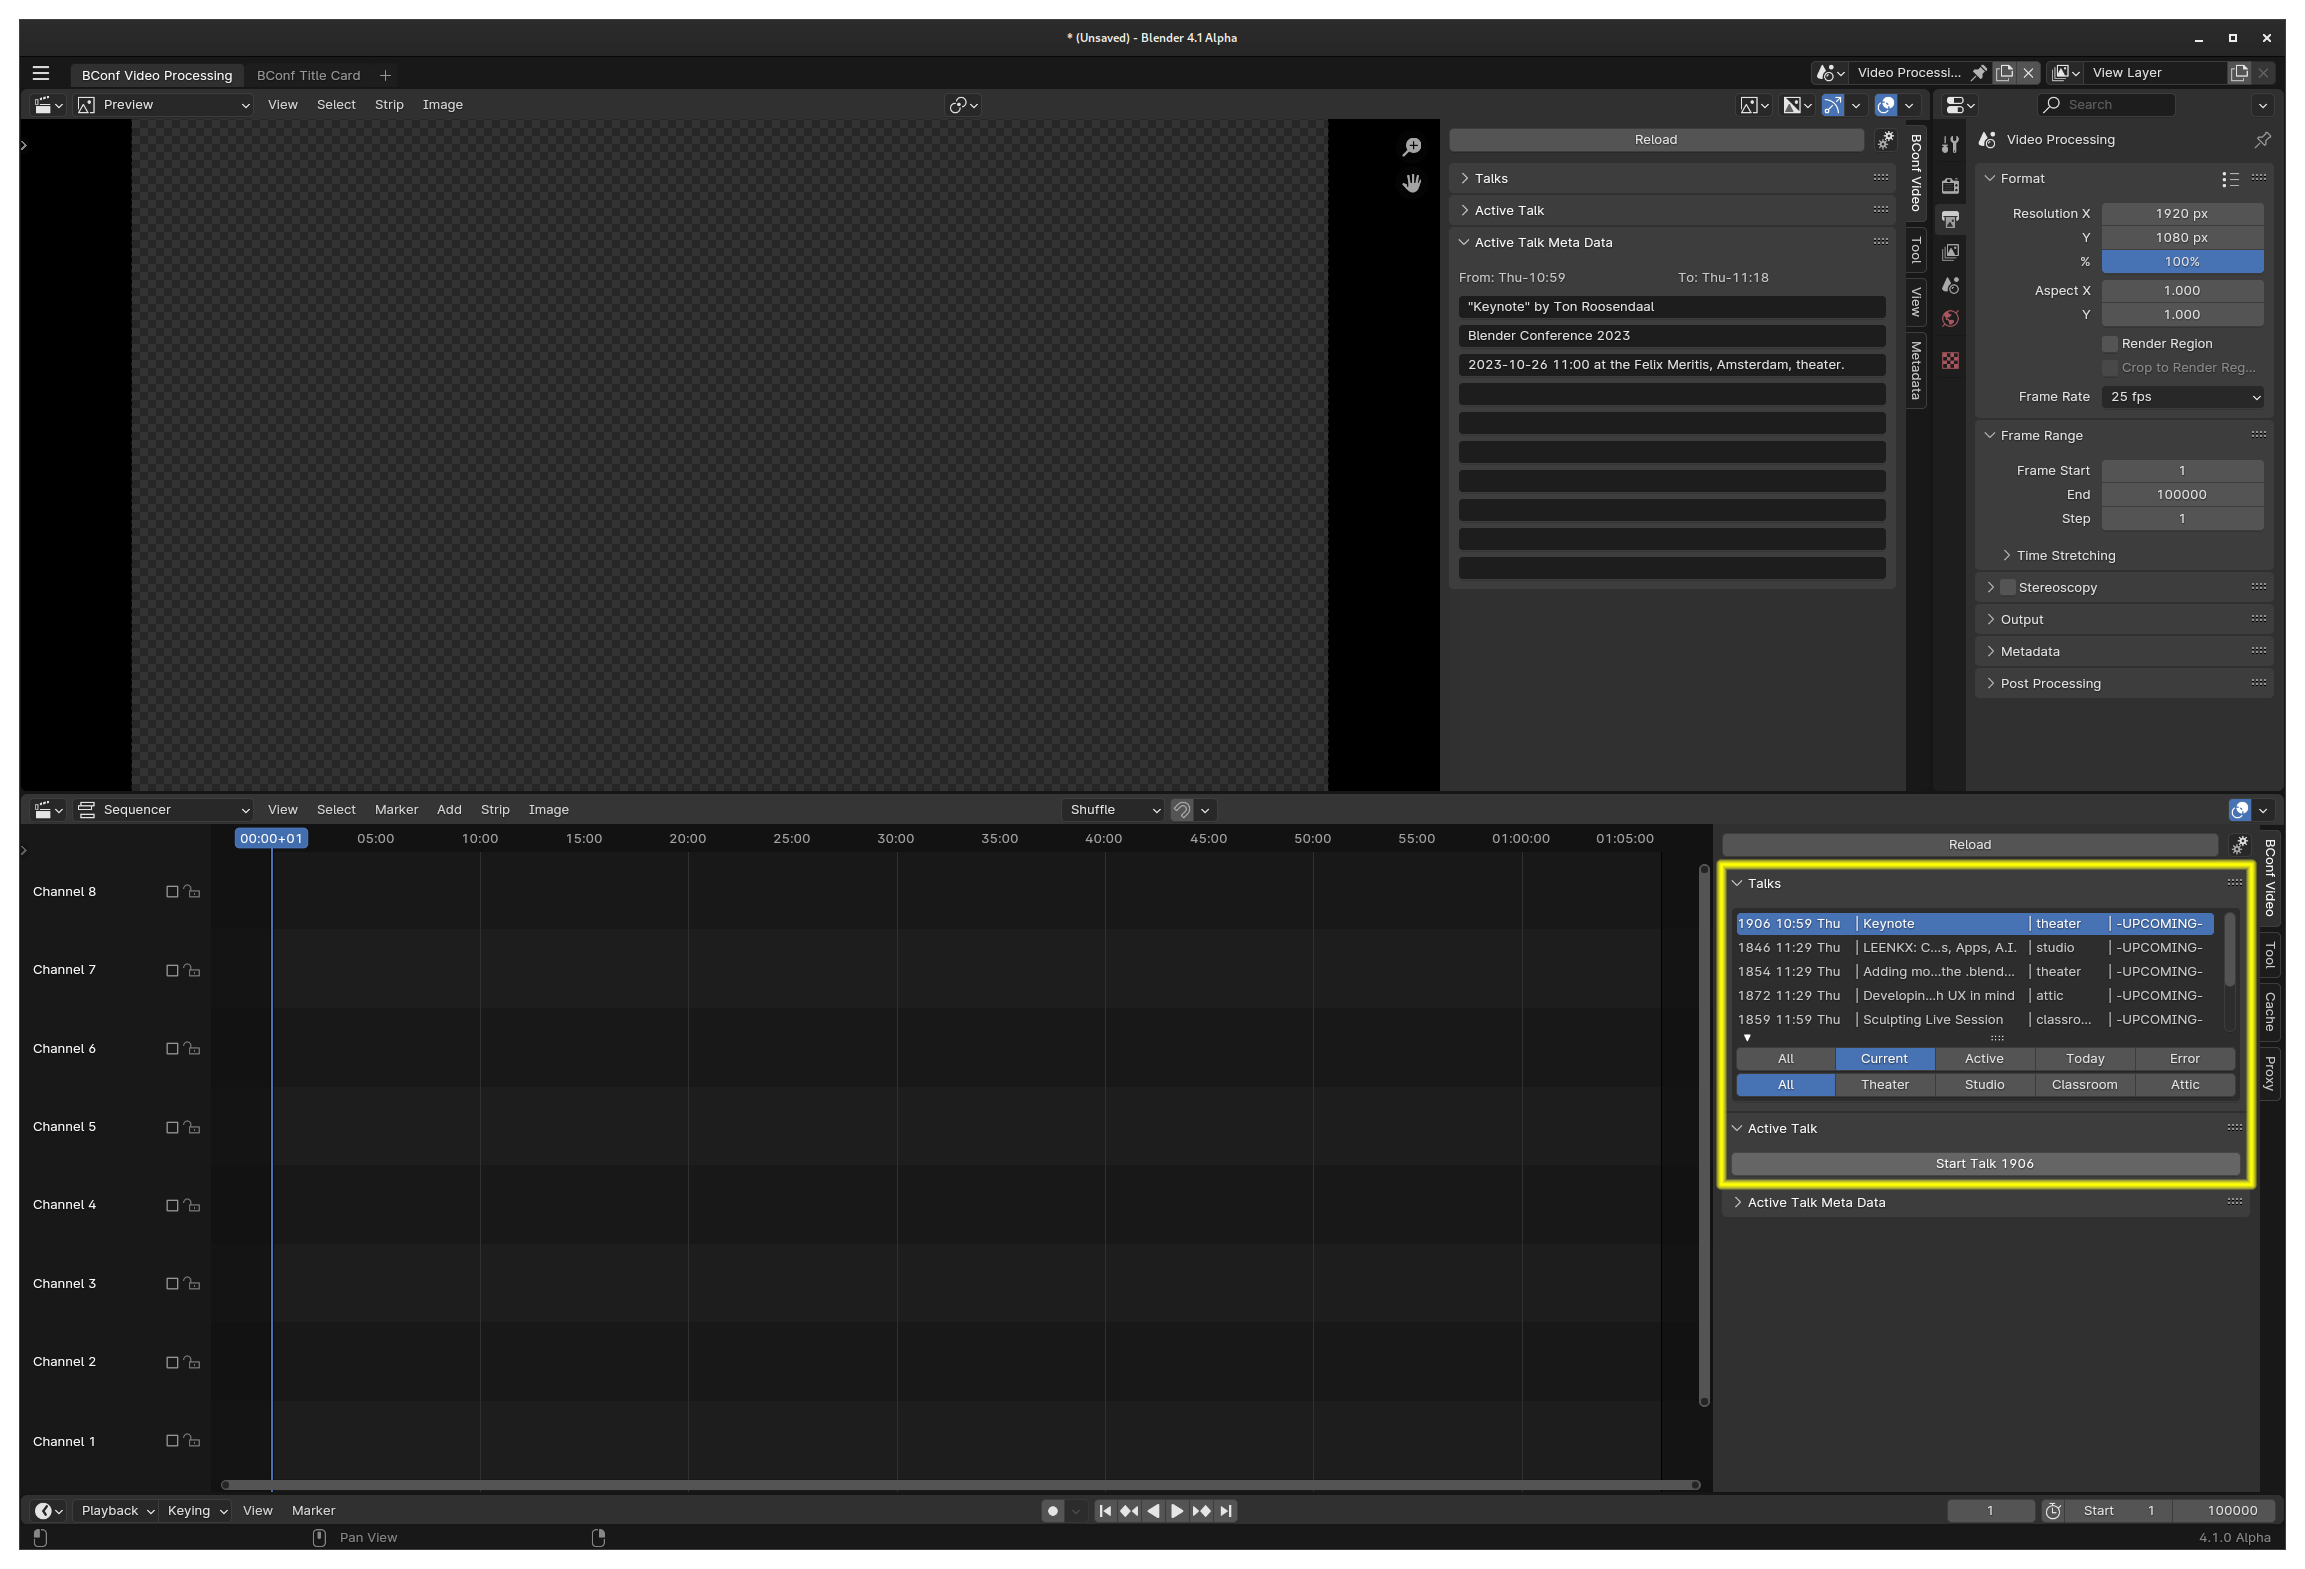
The main interaction area in outlined in yellow.
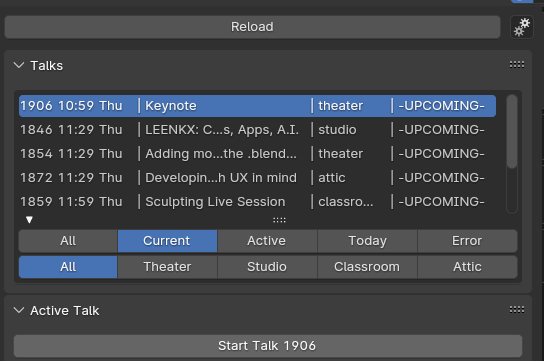
The list contains all known talks. By default, it should be filtered by Current, which only shows talks expected to require attention at current time. The second line of filtering options allows to restrict listed talks to a specific location.
Each entry shows the UID, start time, name, location, and status (stage of processing) of a talk.
A talk is by default in UPCOMING stage. Once its process is started, it will go through the follonwing stages, with actions and info gathered in the Active talk panel:
Acquiring: Select raw video files.Processing: Define cut-in/-out, and thumbnail for the video.Exporting: Render or export all required images and videos, and generate the final video file.Uploading: Upload the video on Youtube, put it in the right playlist, add its thumbnail.Done: All processing is done, temp working files are cleaned up, this talk is done.
Moving to the next stage is done using the Next button, and the Prev one can be used to re-work a previous stage if needed.
Certain stages (especially Exporting and Uploading) can take some time (several minutes or more), other talks can be worked on in the mean time.
Acquisition
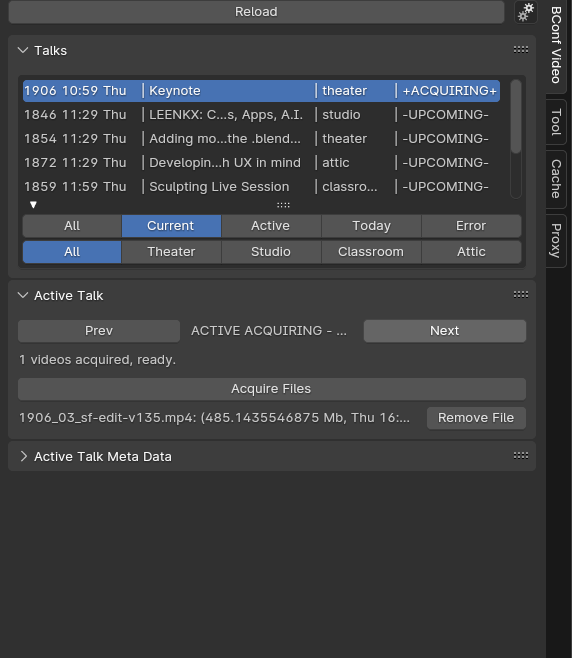
Click on Acquire Files button to open a filebrowser and select the raw video files.
Once validate, the selected file is checked, and the talk can move to the next stage. Note that no more than one file should be acquired for a given talk. The Remove File button can be used to remove mistakenly acquired files.
Processing
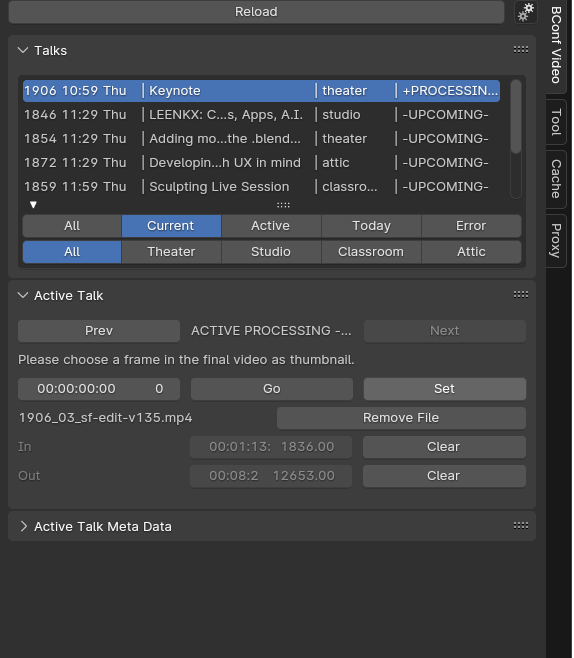
This stage requires the user to set cut-in and cut-out points first, while the raw video is shown in the VSE.
Once this is done, a mock-up of the final edit is created in the VSE, with the titlecard strip.
User can then choose the thumbnail frame for this talk, and move to the next stage.
Exporting

The only action required here is the validation of the final video, at the end. Validate Final Export will launch an external video player with the final export, please ensure eveything is fine. Check for valid in/out points, no sound offset, proper title card... Then close the video player, click on OK, and move to the next stage.
Uploading
The only action required here is the validation of the final uploaded video on Youtube, at the end. Validate Final Upload will launch a webbrowser with the edit page of the uploaded video, please ensure eveything is fine. Note that the video will require several minutes to be available on the platform. Check for general video quality,, valid thumbnail, description... Once the video is ready, publish it, and then in back in the BCon App, click on OK.
Done
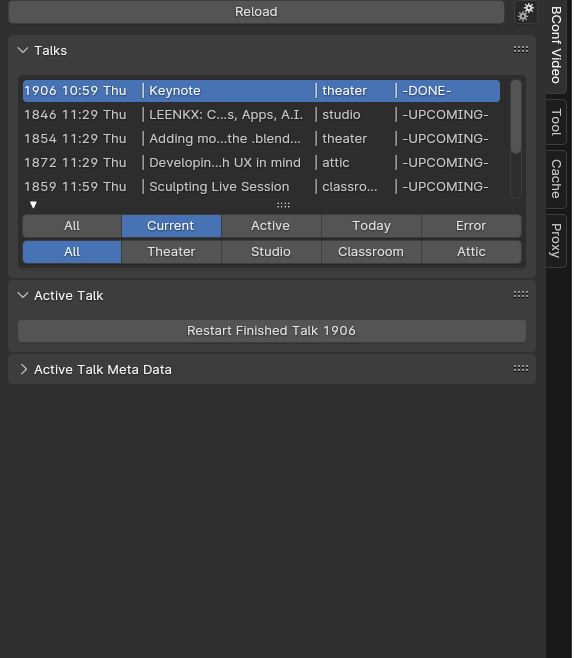
The final stage cleans up both local work directory, and the VSE strips, and move back the talk into an inactive 'Done' status.
Preparation of a New Machine
- Install or build blender. The tool is tested on
main, aka currently Blender 4.4 alpha. It should work on any Blender 4.x version though. git clone https://projects.blender.org/infrastructure/conference-video-processing.gitto wherever you want.- Create a
bcon_applink from your~/.config/blender/<blender_version>/scripts/startup/bl_app_templates_userfolder (create it if needed), to the./bcon_appdirectory in newly cloned repository.
The BCon App can be selected from the Blender splash screen, or File -> New menu, or by launching Blender with the --app-template bcon_app parameter.
The first time the app is ran, it is recommanded to open the litle 'Settings' cogs menu button to the upper-right corner of the BCon Video tab in the VSE, and execute the ! Install Dependencies ! command. This will ensure additional python module, and system apps, are installed. Note that it works only on Debian systems (or similar, using apt package manager), and that it will require the sudo password in the console to complete successfully.
Preparation for a New Conference
- Create a YouTube playlist named
Blender Conference 20NN(with the current year, of course). - Update
./bcon_app/settings/pyin the cloned repository. These settings at least need to be updated, probably others too:BCON_YEARYOUTUBE_PLAYLIST_IDAPP_DATA_ROOTWORK_DATA_ROOT
- WARNING:
APP_DATA_ROOTwill contain sensitive data that should never be made public (e.g. committed in the git repository, etc.). - Get proper OAuth credentials for uploading to YouTube (you need to be administrator for the Blender google account for this):
- This may not always be required, previous year's credential may still be valid.
- Go to the Google console.
- If the YouTube Uploader credentials don't exist any more, create them (Create credentials → OAuth client ID → Other → Name: youtube-upload → Create → OK)
- Download JSON: Under the section "OAuth 2.0 client IDs".
- Save the file to
client_secret.jsonin theAPP_DATA_ROOTdirectory.
- Run a test video processing with the app.
- When it reaches the
Uploadstage the first time, it will open a web browser to finalize the authentification steps. - This will create another
...oauth2.jsonfile inAPP_DATA_ROOT, containing all the required token for the upload process. - In case something goes wrong, this latest file needs to be deleted to trigger the authentification process again.
- When it reaches the
- Ensure the remote NAS storage is mounted on the machine.
- Create an app shortcut launching Blender with the proper settings from a terminal (
.desktopfile in~/.local/share/applicationsfolder).