Page updated on 2024-05-16
Atomic Blender (PDB/XYZ)
The Atomic Blender (PDB/XYZ) add-on imports atomic structures
(molecules, crystals, clusters, particles, surfaces, etc.), which are
described in PDB (.pdb) and XYZ files (.xyz) (Section Import
PDB/XYZ). The add-on reads the coordinates of all
atoms in the PDB/XYZ file and represents the atoms as balls in the
Blender world. Also the sticks, which are described in PDB files only,
are shown if the sticks are explicitly listed in the PDB file. The
Principled BSDF shader
is used to describe the material properties of the atoms.
Note
Speed advantage
Thanks to the Blender specific method called instancing vertices structure, which is used to build an atomic structure, the speed of the loading and the general handling of an atomic structure inside the Blender 3D View is quite fast. Atomic structures with 1000 atoms and much more can be easily handled.
For the import, many options can be chosen, which allow representing the atoms and sticks in different ways. With help of several tools in the Atomic Blender Utilities panel, the atomic structures can be modified after the import. Note that the coordinates of selected atomic structures in the Blender 3D world can also be exported into PDB/XYZ files.
General motivation
Atomic Blender (PDB/XYZ) is interesting for scientists, who want to visualize with Blender their atomic structures described in PDB or XYZ files. Thanks to Blender, fancy graphics of molecules, crystal structures, surfaces, nanoparticles, clusters and complex atomic arrangements can be obtained. Such graphics meet the standards of top-level journals, which have a high impact factor. See Examples at the end of this page.
Note
Info about PDB and XYZ
- Description of the PDB file format: Wikipedia and RCSB.
- Description of the XYZ file format: Wikipedia and Open Babel.
- Some notes about PDB and XYZ files can also be found here and here.
- Many molecules can be downloaded from the RCSB site (go to 'Download').
- A list of software that deals with PDB in different ways can be found on the RCSB site. There also is Vesta, ASE and all the quantum chemical calculators used in research, which can create or even calculate atomic structures and store them in PDB/XYZ files.
Note
Forum
- Please, use the Blender Artists forum for comments and questions or directly the Blender chat.
Warning
- There also is the possibility to ask questions on Stack Exchange. However, note that some of the developers like Blendphys don't have enough credits, which are, however, needed to have the permission for giving answers on Stack Exchange.
Note
Defects in an atomic structure
- If you want to show defects like vacancies in an atomic structure, use an 'X' for the element name in the PDB or XYZ file (see here). A defect is shown in the form of a cube.
Import PDB/XYZ
Camera & Lamp
A camera and/or a light source are placed into the 3D world. Both are placed such that the entire atomic structure can be well seen by the camera with enough light from the light source.
Object to Origin (PDB)
The atomic structure is placed into the origin (0.0, 0.0, 0.0) of the 3D world.
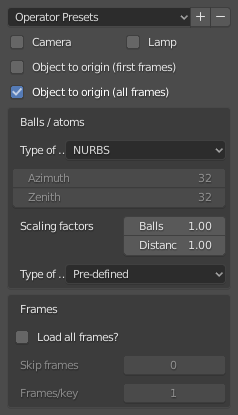
Object to Origin (XYZ)
Either in only the first or in all frames, the atomic structure is put into the origin (0.0, 0.0, 0.0) of the 3D world.
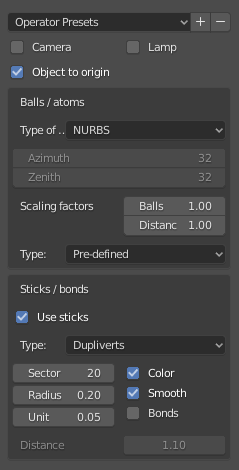
Balls/Atoms
-
Type Of - Choose either NURBS, Mesh or Metaballs for the atoms.For option Mesh, the Azimuth and Zenith values can be chosen. Metaballs can lead to some fancy effects: for instance, if enough large, their shapes melt together showing some kind of surface effect.
-
Scaling Factors - The atom radii as well as the distances between the atoms can be scaled by a simple factor.
-
Type - The type of atom radius (atomic, van der Waals or as predefined) can be chosen.
Sticks/Bonds (only PDB)
- Use Sticks - Use sticks or not. Note that the sticks must be listed in the PDB file. The add-on does not 'calculate' possible bonds between atoms, which are then shown as sticks!
-
Type - In general, the options Sector and Radius determine the precision and dimension of the sticks, respectively. Option Smooth always means that a Smooth operator is applied on the sticks. Option Color means that the stick is divided into two parts, showing the colors of the respective two atoms which it connects.
-
Instancing Vertices - The sticks of one element are put into one instancing vertex structure and the sticks appear as cylinders. The instancing vertex structure makes the displaying and loading of many sticks relatively fast (see Section The instancing vertex structure for more info). Options Unit is the length of a unit (a small cylinder): several of such units are put together forming actually the stick (cylinder). The longer the unit length is the less is the number of such units and thus the faster is the displaying. However, if the unit length is too long the stick becomes eventually longer than the bond length (distance between atoms). This can then lead to a 'overlapping effect' where a stick intersects the atoms. Option Bonds displays apart from single also double, triple, etc. bonds whereas option Distance is the distance between the bonds measured in stick diameter.
-
Skin - The skin and subdivision modifiers are used to build the sticks. This gives a nice network of sticks, which can be used to show, e.g. only the bonds of the structure (delete the atoms before!). Options SubDivV and SubDivR are parameters of the subdivision operator. If option Smooth is activated, the initial squarish profile of the sticks changes to a more circular one. Note that if this option is chosen, there is only one object representing all sticks.
-
Normal - Normal cylinders are used. For each bond, one individual cylinder is used. If option One Object is activated, all sticks are joined into one mesh object. This makes displaying the sticks very fast. However, individual sticks do not exist anymore.
-
Frames (only XYZ)
-
Load All Frames - Load only the first or all frames.
-
Skip Frames - Skip and load only each n-th frame. This is quite useful for large data where it might be sufficient to show only each 4th frame.
-
Frames/Key - Show a specific number of frames per key. Many frames in a key lead to a more fluid presentation.
Note
Please, keep in mind that the number of atoms in a frame has to be the same for all frames!
The instancing vertex structure
It is essential to understand, how the atoms (and sticks) of an atomic structure are organized inside Blender. This is why we focus a little bit onto this in the following:
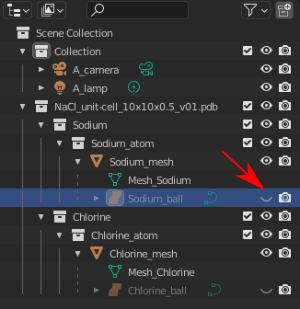
When atomic structures are imported via the PDB or XYZ importer, the atoms are put into a so-called instancing vertex structures, somewhat into 'groups' of elements. For instance, all sodium atoms of a NaCl structure form one instancing vertex structure, and the same applies for the chlorine atoms (see figure). In the case of the sodium atoms, there is a collection Sodium that includes the collection Sodium_atom. Within the latter, the Sodium_mesh is composed of the mesh itself (Mesh_Sodium) and a ball called Sodium_ball. The mesh only contains vertices (no objects!), and the vertices are located at the x,y,z positions specified in the PDB/XYZ file. What Blender is doing is simply 'duplicating' the 'representative' ball Sodium_ball at all the vertices! Because only one ball is used, it makes things incredibly fast by representing, e.g., a thousand of atoms inside Blender. Note that the representative ball is in the center of the structure, without having any meaning. This is the reason why the visibility switch of the representative ball is switched off (see red arrow)!
There are some consequences:
- The representative ball appears at all vertices with the same orientation.
- Changing the material properties of the representative ball changes the properties of all duplicated balls.
- A ball is NOT an individual object, it is rather a linked member of the structure. Actually, the object as such does not exist.
- As mentioned above, the handling of an atomic structure inside the 3D View is very fast.
Modifications
-
Displacing an 'individual' atom - For this, the respective vertex has to be displaced: go into the Edit Mode and select the atom. You can now displace the atom (vertex).
-
Changing material properties (of all atoms) - For this, the material properties of the representative ball must be changed: in the outliner, switch on the visibility of the representative ball (here, Sodium_ball, see red arrow in figure). You can then select the ball and change the material properties. After, make invisible the representative ball, otherwise it appears in the structure.
-
Separate an atom - For this, see Section
Separate Atoms_.
For making the handling of the atomic structures a bit more easy, the utility panel can be used, see the next Section.
Note
Converting All Atoms of an Instancing Vertex Structure to Real Independent Objects
Do the following: Select the atomic structures with the mouse and use bpy.ops.object.duplicates_make_real. With this, you produce real independent objects! In the Outliner, delete the remaining instancing vertex structures, named like "Carbon", "Hydrogen", etc.
Warning
Note that if a large atomic structure is converted as described above, the structure contains many hundreds and thousands of individual objects (e.g., atoms). Blender can then become quite slow because it has to deal with all of the objects in several ways. As mentioned above, for each instancing vertex structure, there is only one representative ball object!
Atomic Blender Utilities Panel
The Atomic Blender Utilities panel makes your life easier during manipulating atoms of imported structures.
Custom Data File
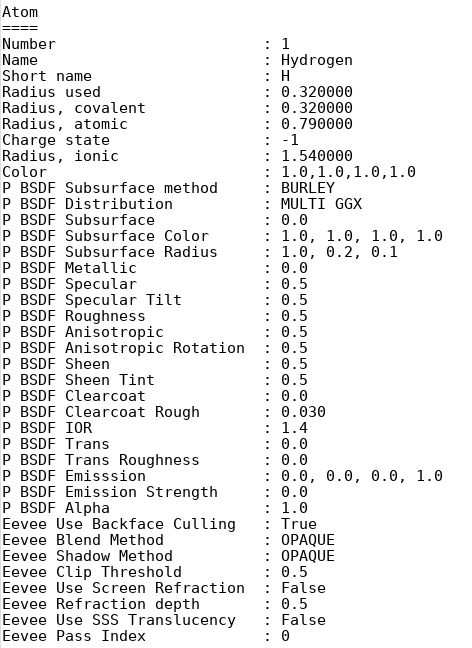
A separate custom data file can be loaded, which contains for each element the following information (see figure):
- All types of radii (atomic, VdW, ionic) in Å
- Ball color
- Other material properties for the Principled BSDF shader.
Such an option is useful when it is desired to use predefined values for atom radii and shader properties. An example can be downloaded from here: Custom data file.
The custom data file is an ASCII file, which can be duplicated and
modified by the user. The radius and material properties of the atoms
can be changed as follows: open the ASCII file with a standard text
editor, search the name of the atom and change the radius (Radius used). Do the same with, e.g., the RGB values for the color
(Color). The value RGBA(1.0, 1.0, 1.0, 1.0) corresponds to white
and RGBA(0.0, 0.0, 0.0, 1.0) is black. Note that the last value of a
color tuple is the alpha value of the color. Furthermore, several other
properties such as Metallic, Roughness and Transmission can
be changed. These are the properties in the
Principled BSDFshader.
There are also some properties for
EEVEE,
which can be used to determine the object's transparency etc.
Note that in the header of the custom data file, all possible values of
the string options P BSDF Subsurface method, P BSDF Distribution, EEVEE Blend Method and EEVEE Shadow Method are
listed.

Inside Blender, the data file needs to be loaded first. The colors and material properties are changed after executing Apply. Note that only selected atoms are changed!
Measure Distances
With this tool the distance of two objects in the Object Mode but also in the Edit Mode can be measured. The unit is Ångström.
Change Atom Size
Note that the atomic structures must be selected!
-
Type of Radii -
-
Type With this selector the type of radii can be chosen. Either one uses Predefined, Atomic or Van der Waals radii. The default values for Predefined radii are the Atomic radii.
-
Charge For option Ionic radii, the charge state can be chosen and the radii of selected objects are instantaneously changed. Select one type of atom (e.g. only all hydrogen ones) and then apply the charge state. Changes only apply if a charge state of an atom is available. See, e.g., in the Custom data file.
-
-
Radii in pm - The radii of all atoms that belong to one element can be manipulated. Type in the name of the atom (e.g. 'Hydrogen') and choose the radius in picometer.
-
Radii by Scale - This modifies the radii of all selected atoms and atom structures with one scaling factor. Type in the scaling factor and increase or decrease the size of the radii by using the Bigger or Smaller button, respectively.
Change Stick Size
The diameter of selected sticks are changed. The buttons Bigger and Smaller allow increasing or decreasing the diameter, respectively. The scale factor determines, how strong the change of diameter will be. By using the Outliner, one can apply these operators on only a selection of sticks (e.g. only the sticks of the hydrogen atoms). Note that changes only apply if the sticks are individual objects, e.g. single cylinders or if the sticks are described in instancing vertex structures.
Change Atom Shape
It is possible to change the atom's shape to a sphere, cube, icosphere, etc. Furthermore, the material of the atom can be changed. First, select your atoms in the 3D Viewport or the Outliner.
-
Shape - Choose the shape in the first selector.
-
Material - Choose one of the materials in the second selector. The materials are only examples, further refinements can be done in the Materials tab of the Properties.
-
Special - Here, you can choose an object with a special shape, material, etc. Such objects are quite nice to represent defects in atomic structures. When choosing such a special object, you cannot anymore separately choose the shape and material from above. In the Objects and Materials tabs of the Properties further changes can be done.
-
Button Replace - After all, push the Replace button. The shape and/or material of all selected atoms are then changed. This option works for objects and instancing vertex object structures.
-
Button Default - If you want to have the default values (NURBS spheres and specific element colors and sizes) of selected atoms push the Default button.
Separate Atoms
To separate single atoms, select the atoms (vertices) first in the Edit Mode. Upon choosing Edit Mode, the Separate button appears at the bottom of the Atomic Blender Utilities panel. If the selectors in Change atom shape remain on Unchanged the type of object (NURBS, mesh, meta) and its properties will not be changed upon separation.
After having chosen the atoms, use button Separate Atoms to separate
the selected atoms: the atoms are now single, new objects, which can be
manipulated in standard way. They appear in the Outliner and carry the
suffix _sep.
Examples
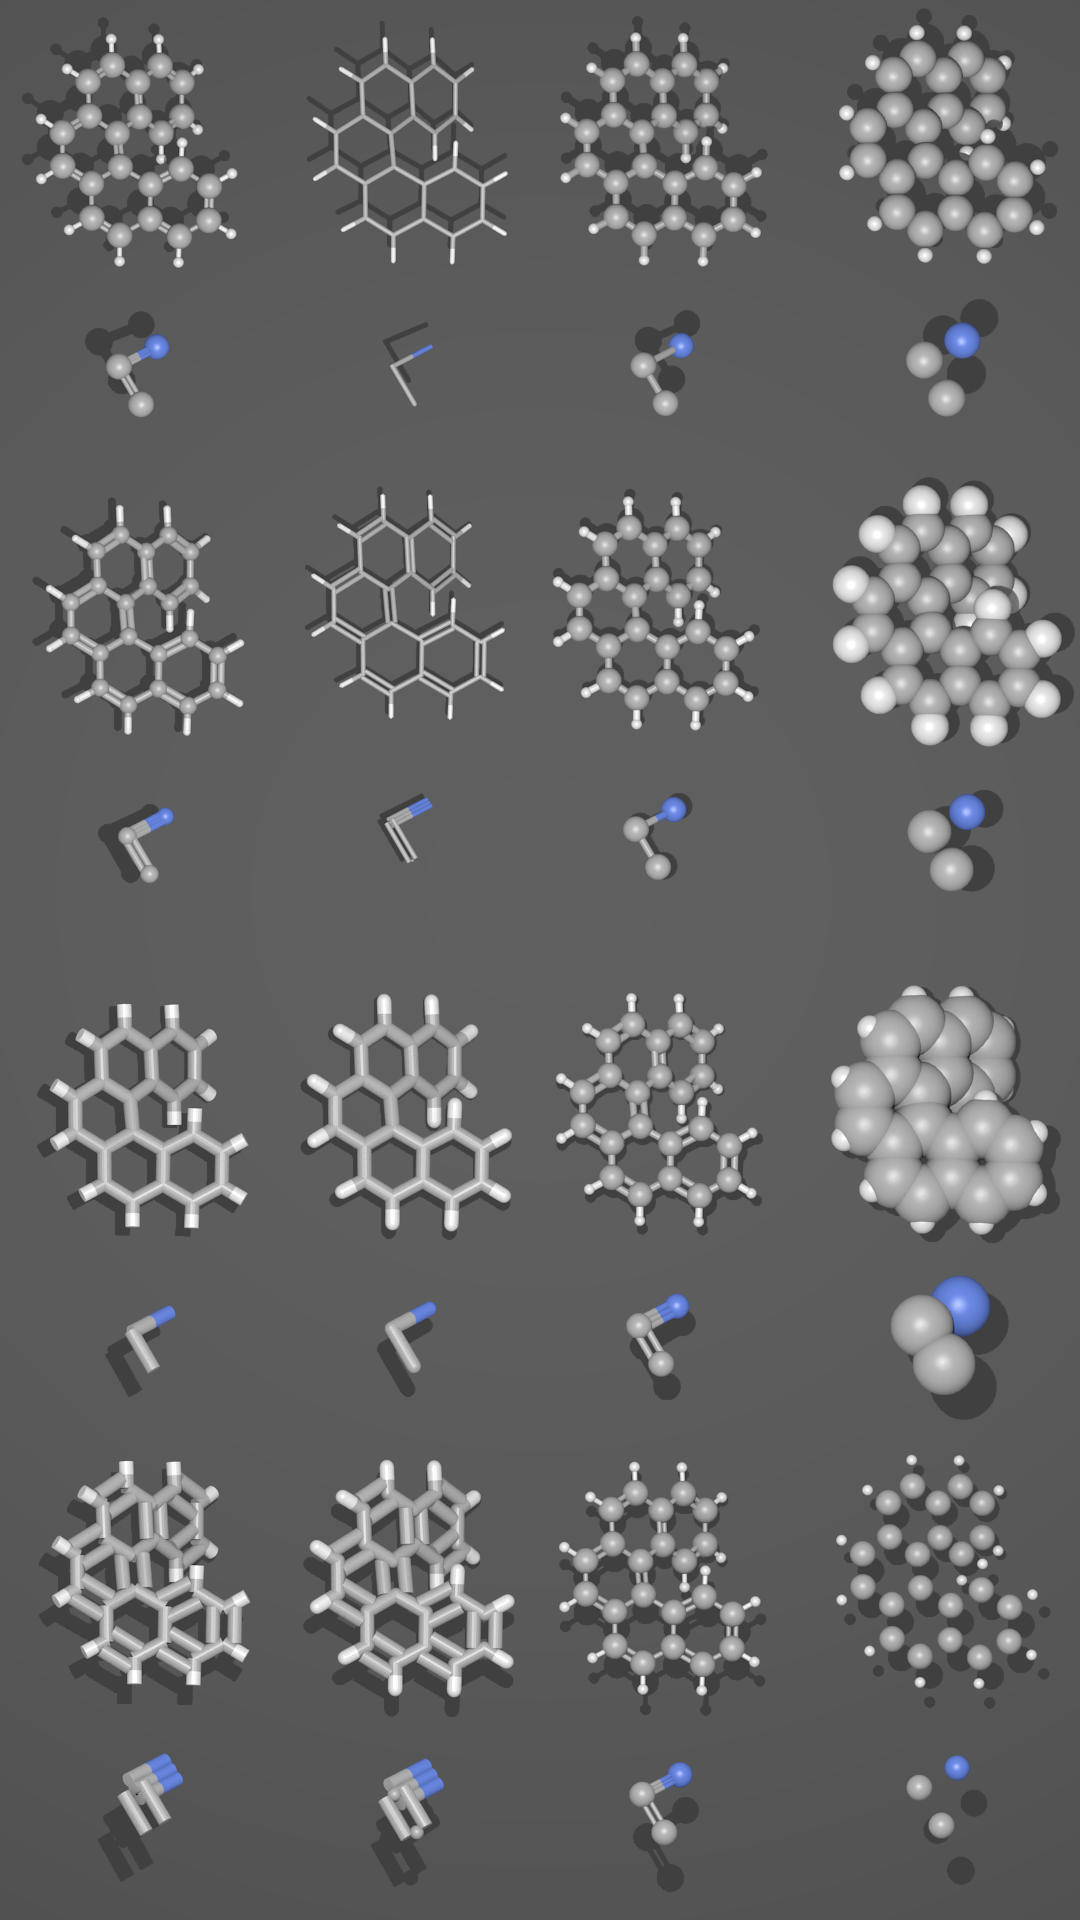

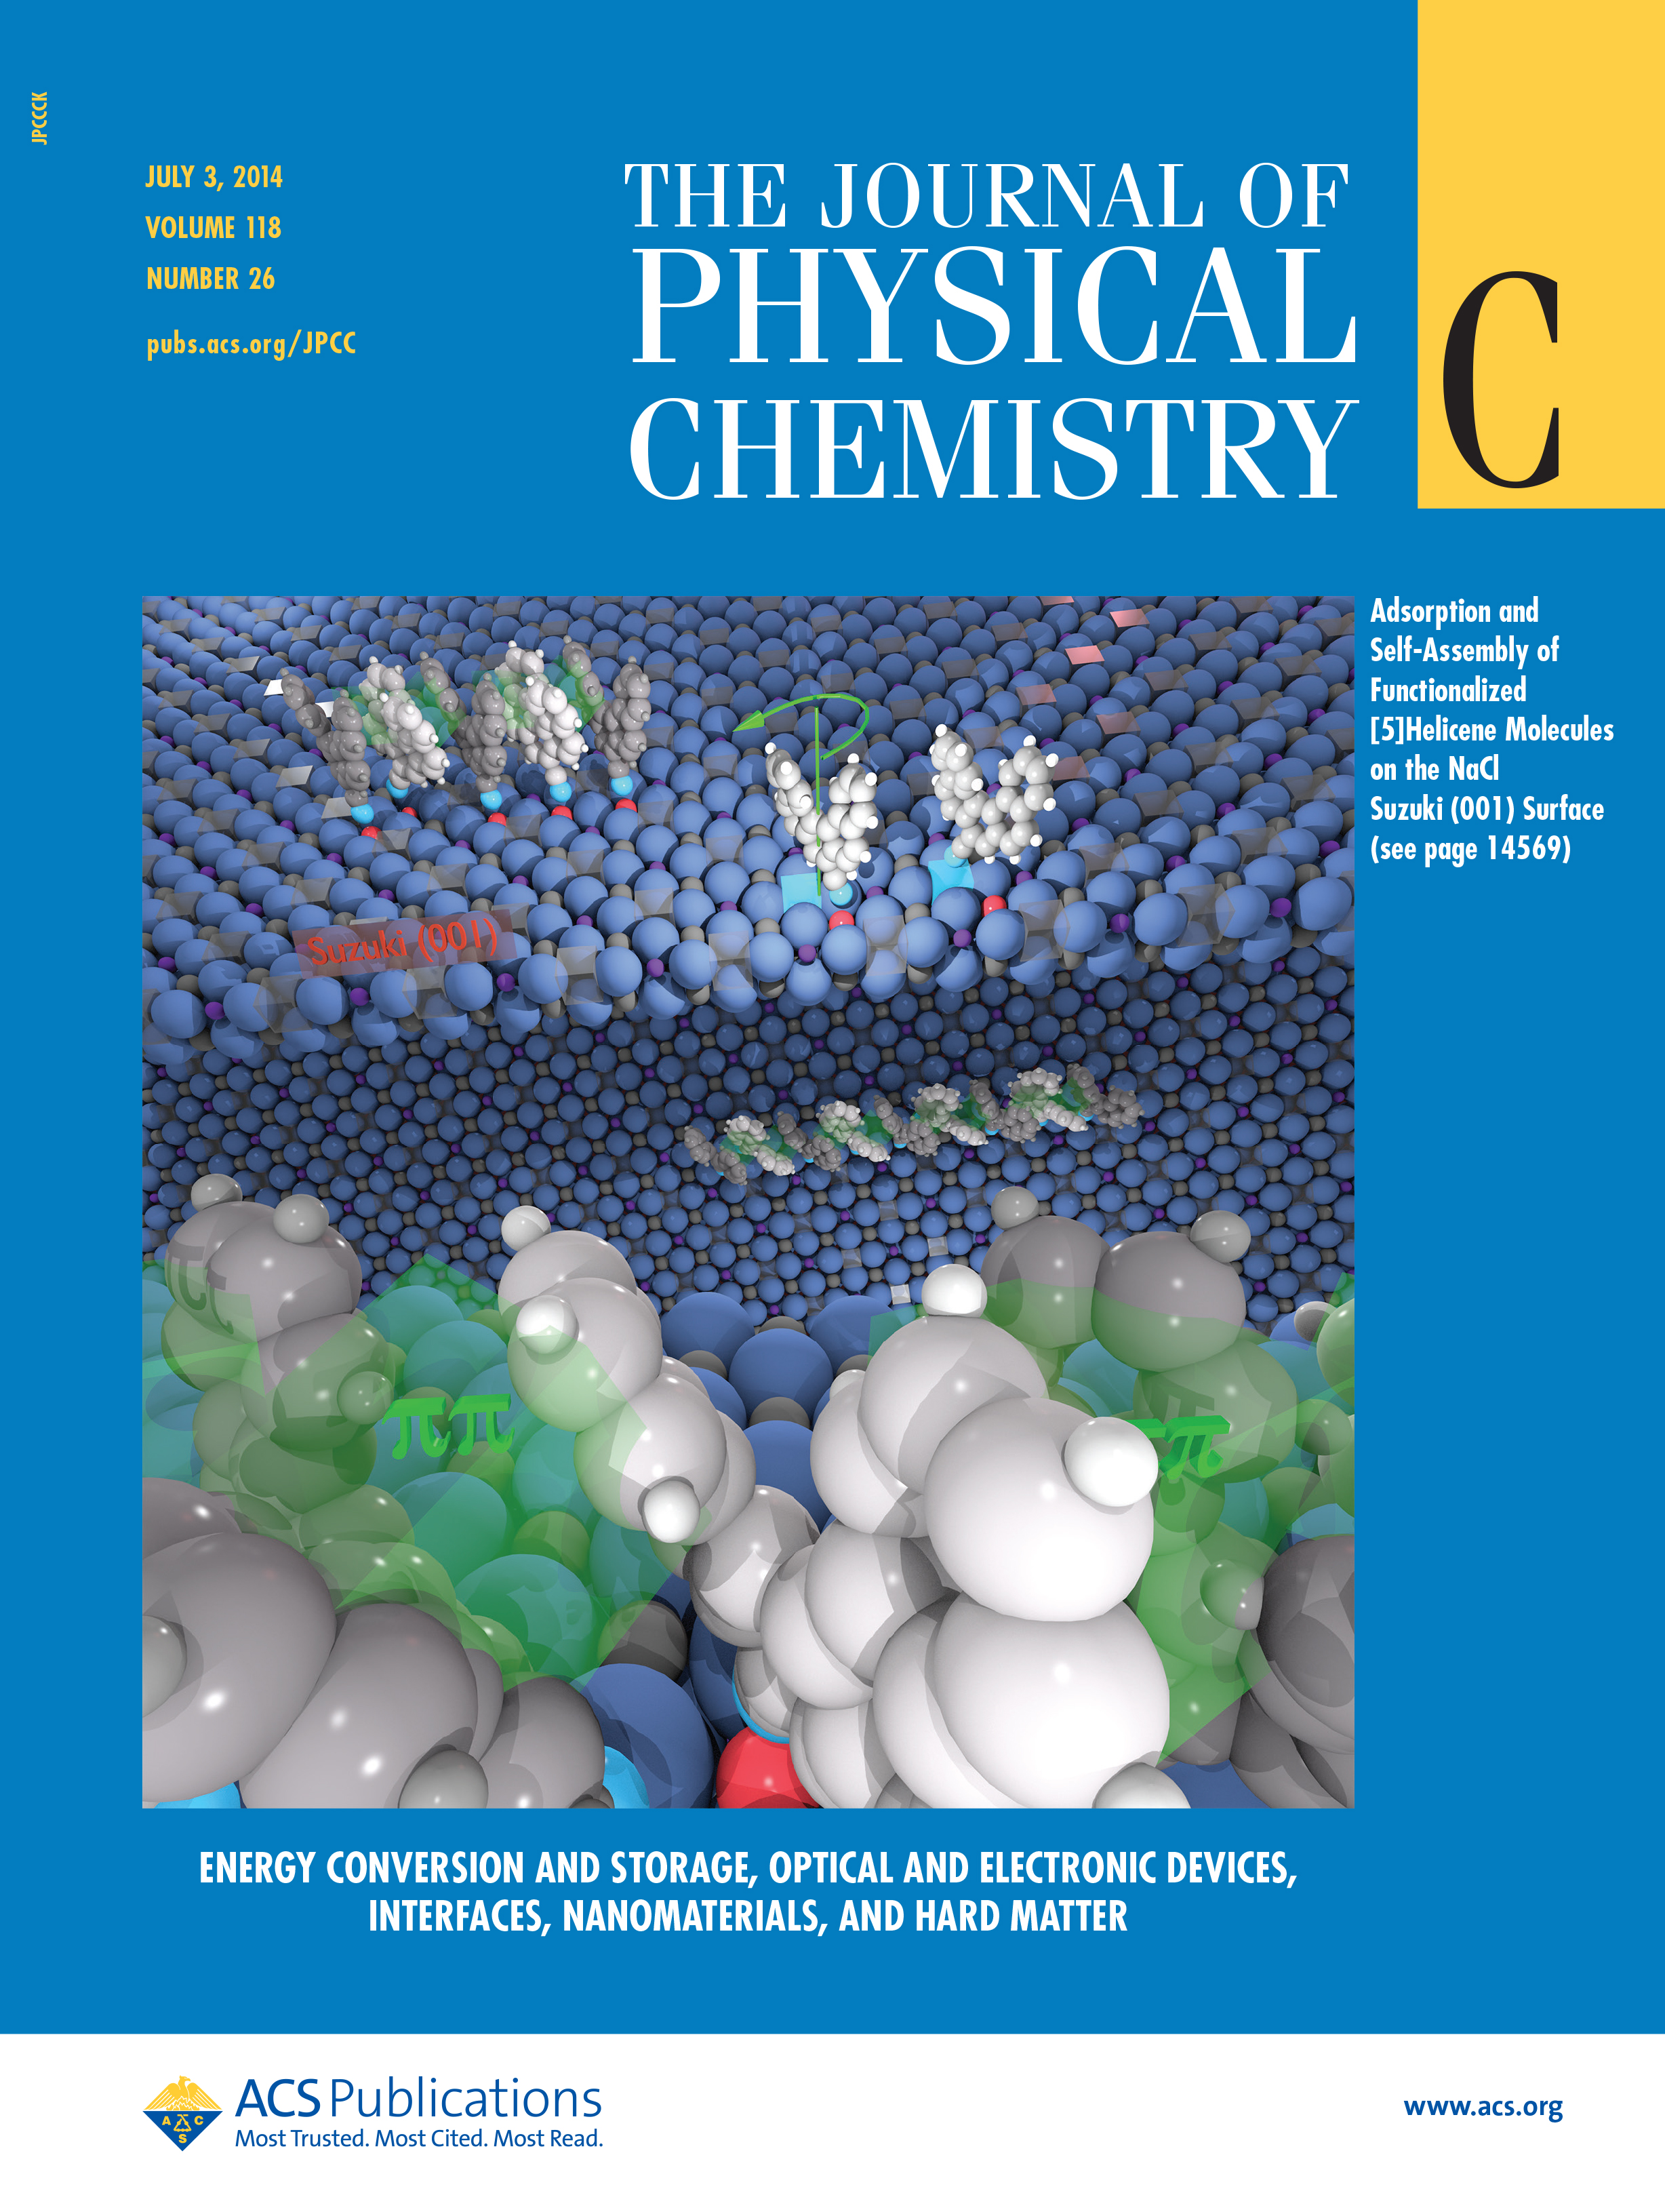

Top left: Different presentations of one and the same molecule. Top right: Part of a DNA molecule. Bottom left: Functionalized [5]helicene molecules on the NaCl(001) surface (Clemens Barth et al. -- Link to publication). Bottom right: Solar cell structure to underline the properties of silicon nanocrystals deposited by pulsed spray system(Mickael Lozac'h et al. -- Link to publication).
Movies
Example 1: This video is a very simple and old one and shows a part of a DNA string.
Example 2: This video is also quite old but still very nice. It exemplifies a surface of a NaCl(001) surface with some atomic sized defects and a pit.
Example 3: This video was created by Sébastien Coget (responsible researcher: Frank Palmino) at the Femto-ST institute in Besançon (France). The movie demonstrates that with Blender, professional movies can be done for research. It was rendered with Cycles.
Tutorials
C.Barth started in August 2011 with the first lines of Blender code and committed the first time in November 2011 in the Blender community. Since then, quite a few tutorials appeared on, in particular, the YouTube platform. Some of the tutorials are listed in the following. Note that there are many other tutorials.
'Recent' contributions
- Blender for Scientists - Make ANY Molecule FAST
- Blender for Scientists - How to Make ANY Molecule in Blender
- Chemistry L2: Loading pdb-files of a small molecule into Blender
Some older tutorials
- Blender Tutorial - Importing a Molecule Using the Protein Data Bank Add On, Making a DNA Animation
- How to Import and Edit a Spherical Fullerene and a Nanotube Using the Atomic Blender Add-on
Publications (research)
The number of people who use the add-on for producing graphics in research is unknown. One can assume already from the number of YouTube tutorials (see above) and related comments and views that the number must be more than, say 20 ! The same applies for the number of publications which show graphics obtained with the Atomic Blender add-on.
Here are some publications that deal with the Atomic Blender add-on itself.
- Scientist or artist? Why not be both?
- App-Free Method for Visualization of Polymers in 3D and Augmented Reality
- Bringing Crystal Structures to Reality by Three-Dimensional Printing
- Immersive visualization for materials science data analysis using the Oculus Rift
- Development of nanoparticle bulk morphology analysis: a multidomain XRD approach
- Principle of interaction between worldwide protein data bank and blender software
- Molecular modeling and creating 3d models of chemical compounds in blender software using the resources of chemspider and open babel